- First Name
- Mark
- Joined
- Mar 9, 2026
- Threads
- 1
- Messages
- 20
- Reaction score
- 26
- Location
- Vancouver, BC
- Vehicles
- Macan Turbo Electric, Land Rover Defender.
- Thread starter
- #1
I just got around to installing the fitcamx into my macan ev using the porsche factory dashcam prewire connection. While I was researching for this I didn't see a proper write up for the macan ev, the post about the '25 cayenne on rennlist was useful, while also misleading. Having specifics for our car would have helped a lot, so figured I'd take a few photos along the way. Took me about 4 hours all up, but I feel like doing it again with these instructions you could probably half that.
When ordering the fitcamx, get the model A, they will reach out to confirm your vehicle model, and when they did this I decided to ask if they had an adapter for the prewire connection. I sent them a picture of the connector, and they threw one in the box with my fitcamx free of charge. I don't know why they don't advertise this on their listing page, but having that adapter really simplifies things. It gives you parking mode without having to bother tapping into fuses, or worry about the piggy back adapter causing issues with your wiper sensor. As it's leveraging the factory dashcam connection I don't see how warranty could have any issues with it.
What you'll need:
- FitCAMX (I got the 4k with rear camera)
- Dashcam prewire adapter from fitcamx
- A good set of pry tools (https://www.amazon.ca/dp/B09BB8VFLY?ref_=ppx_hzsearch_conn_dt_b_fed_asin_title_1&th=1)
- wire pull tool (comes in the pry tool kit above)
- automotive cloth tape and some foam.
Install :
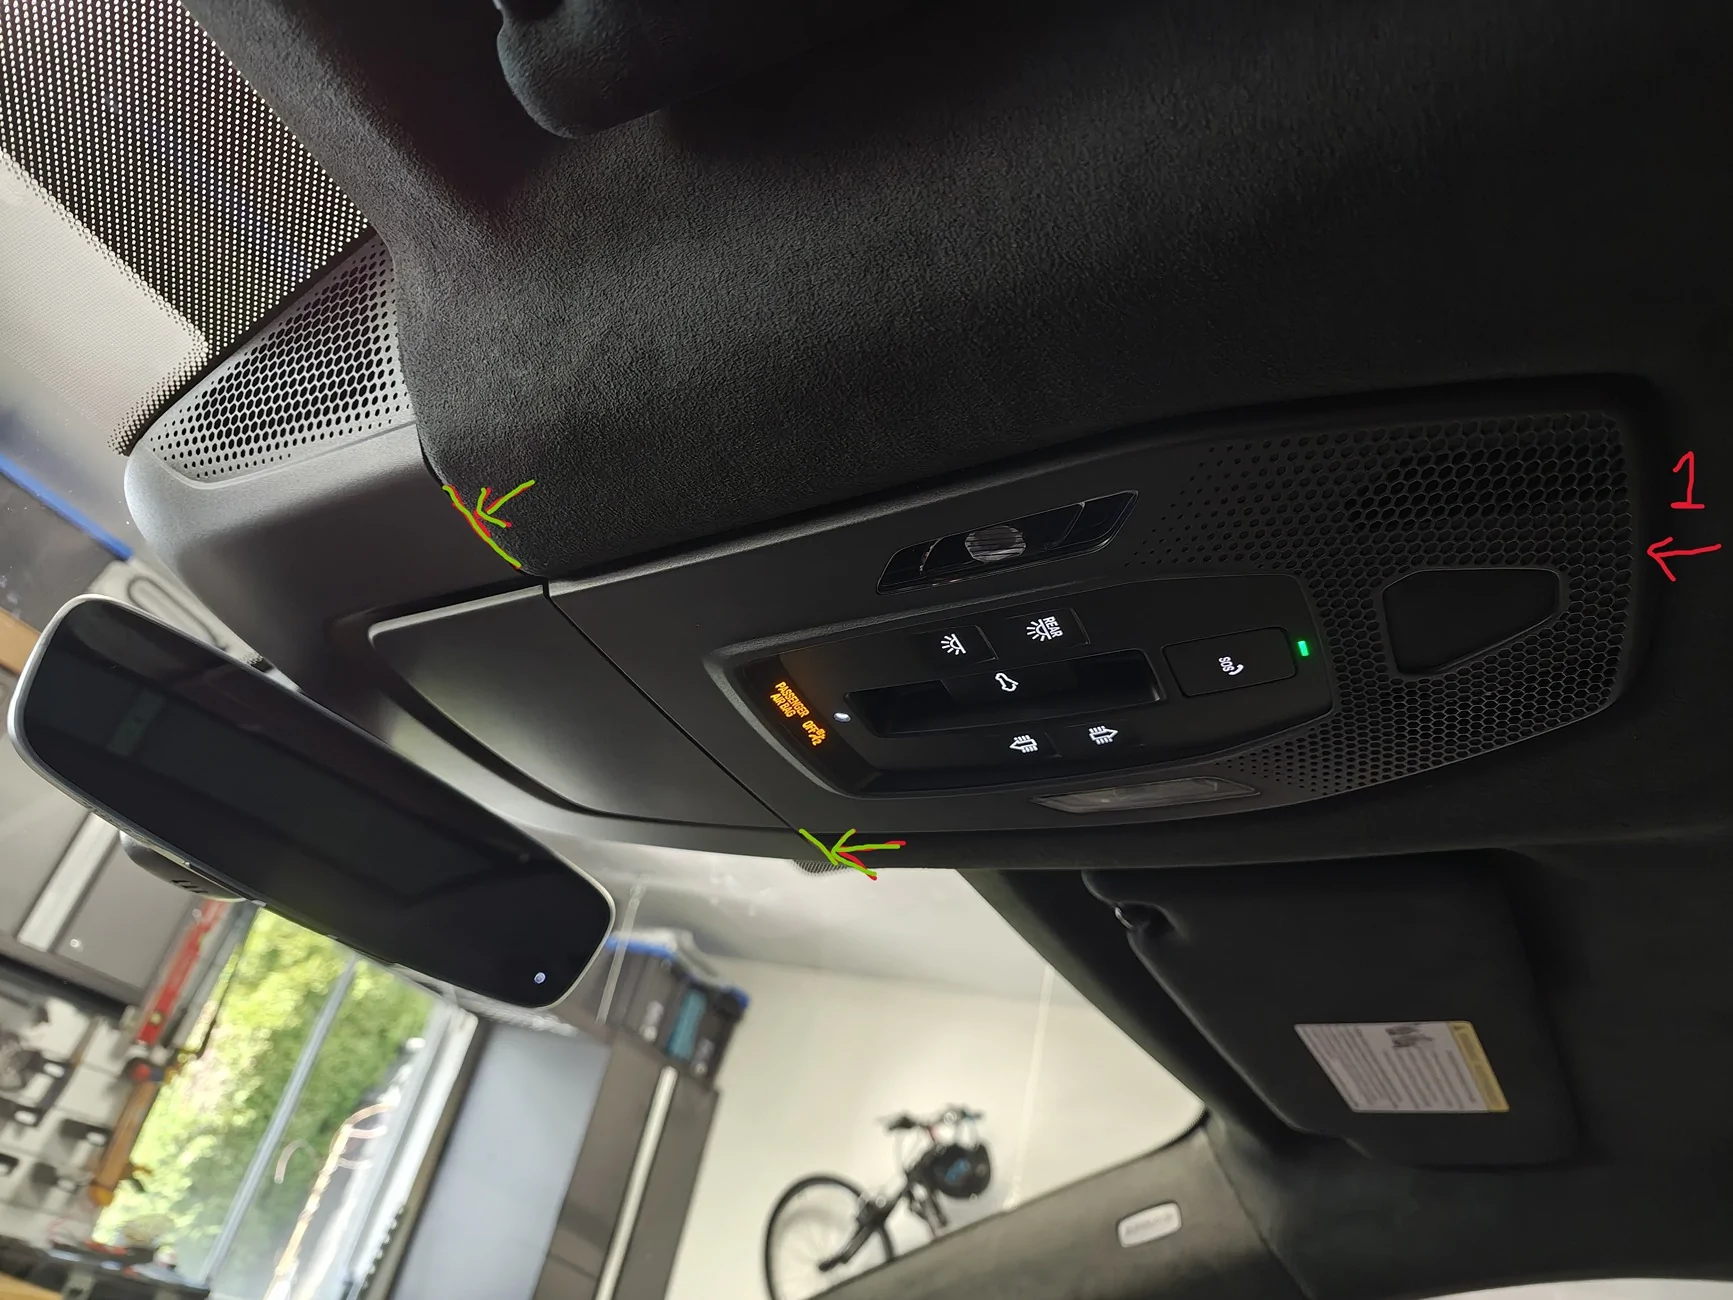
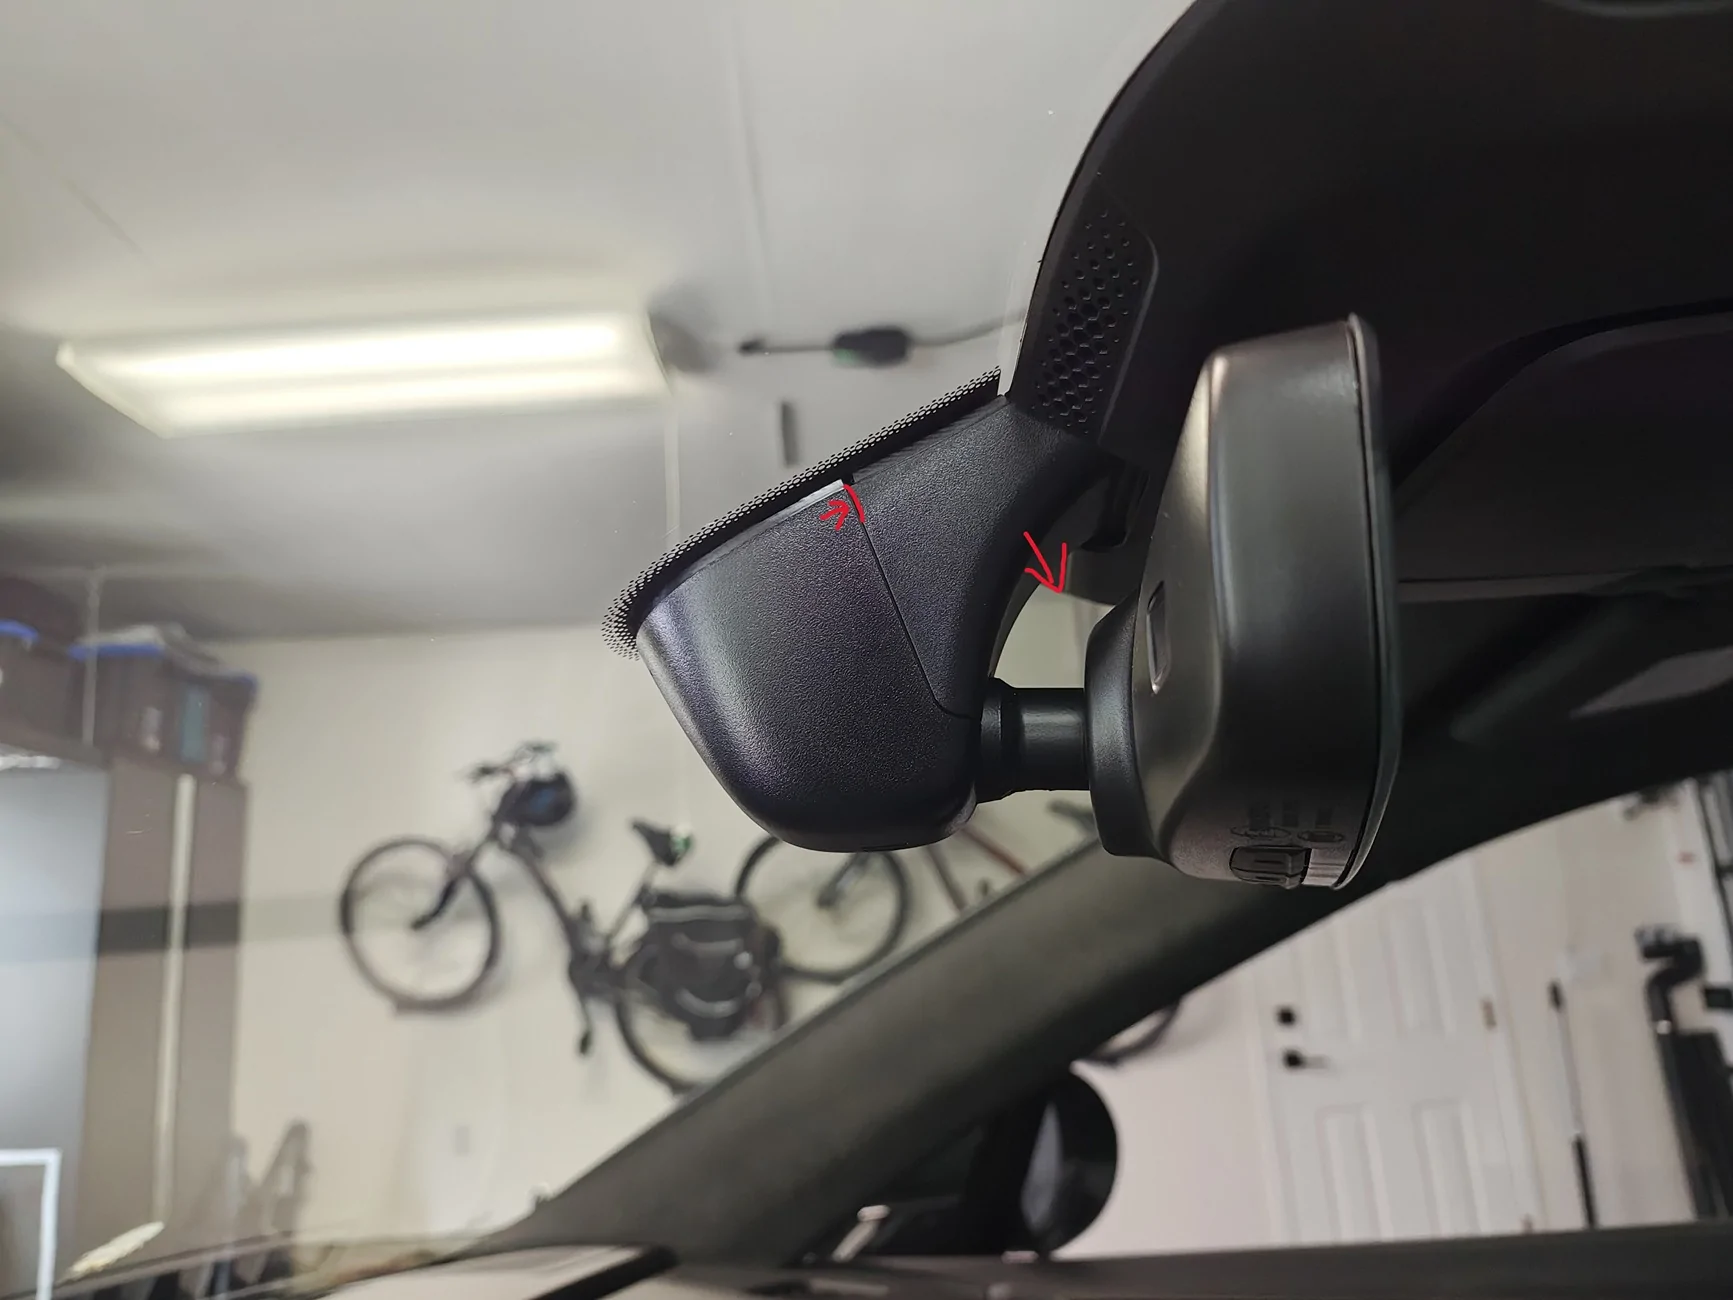
1 - Start by removing the forward part of the overhead console trim. Get two solid wide pry tools at the two green arrows and push towards the windscreen. You can do one side first, I think that is how it went for me. Needs quite a bit of force, be careful not to scratch/mark the trim.

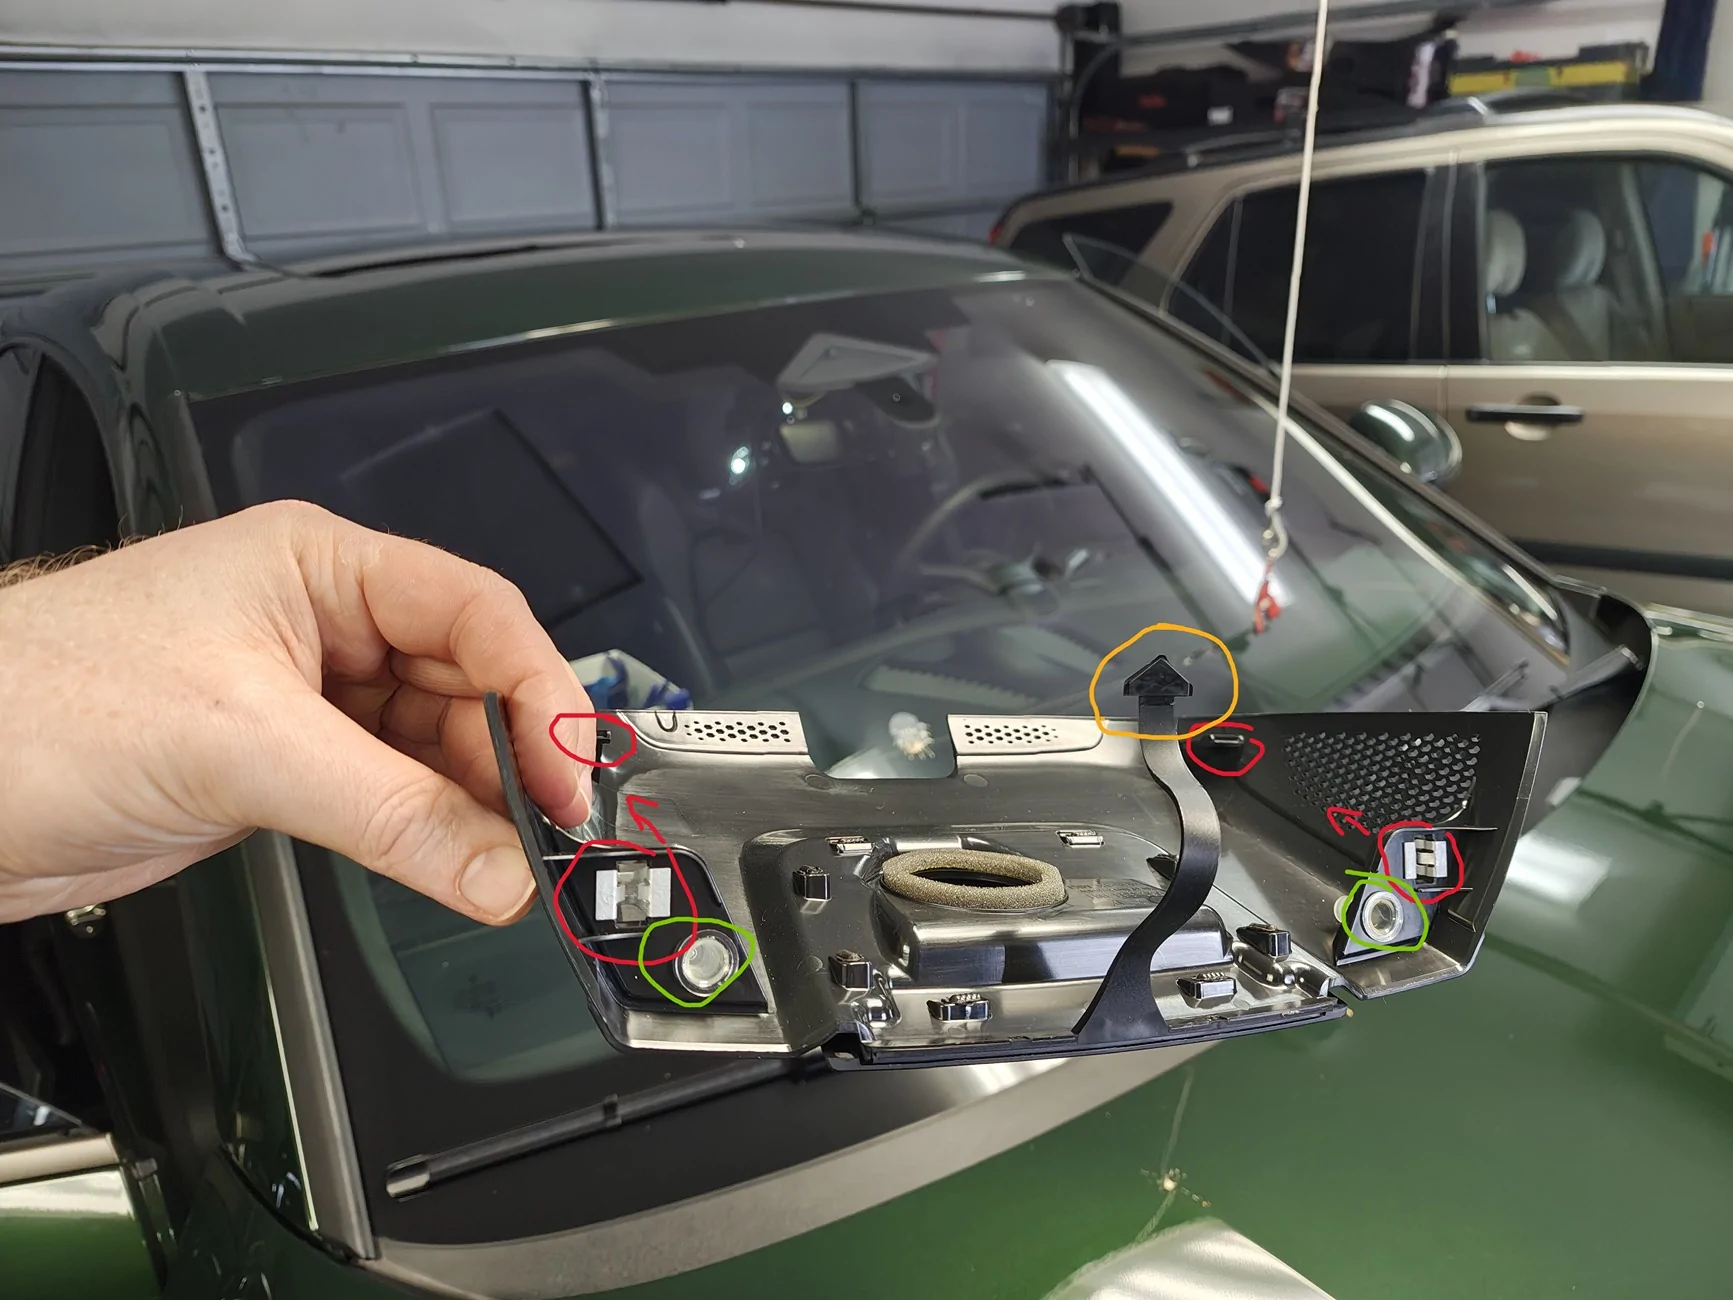
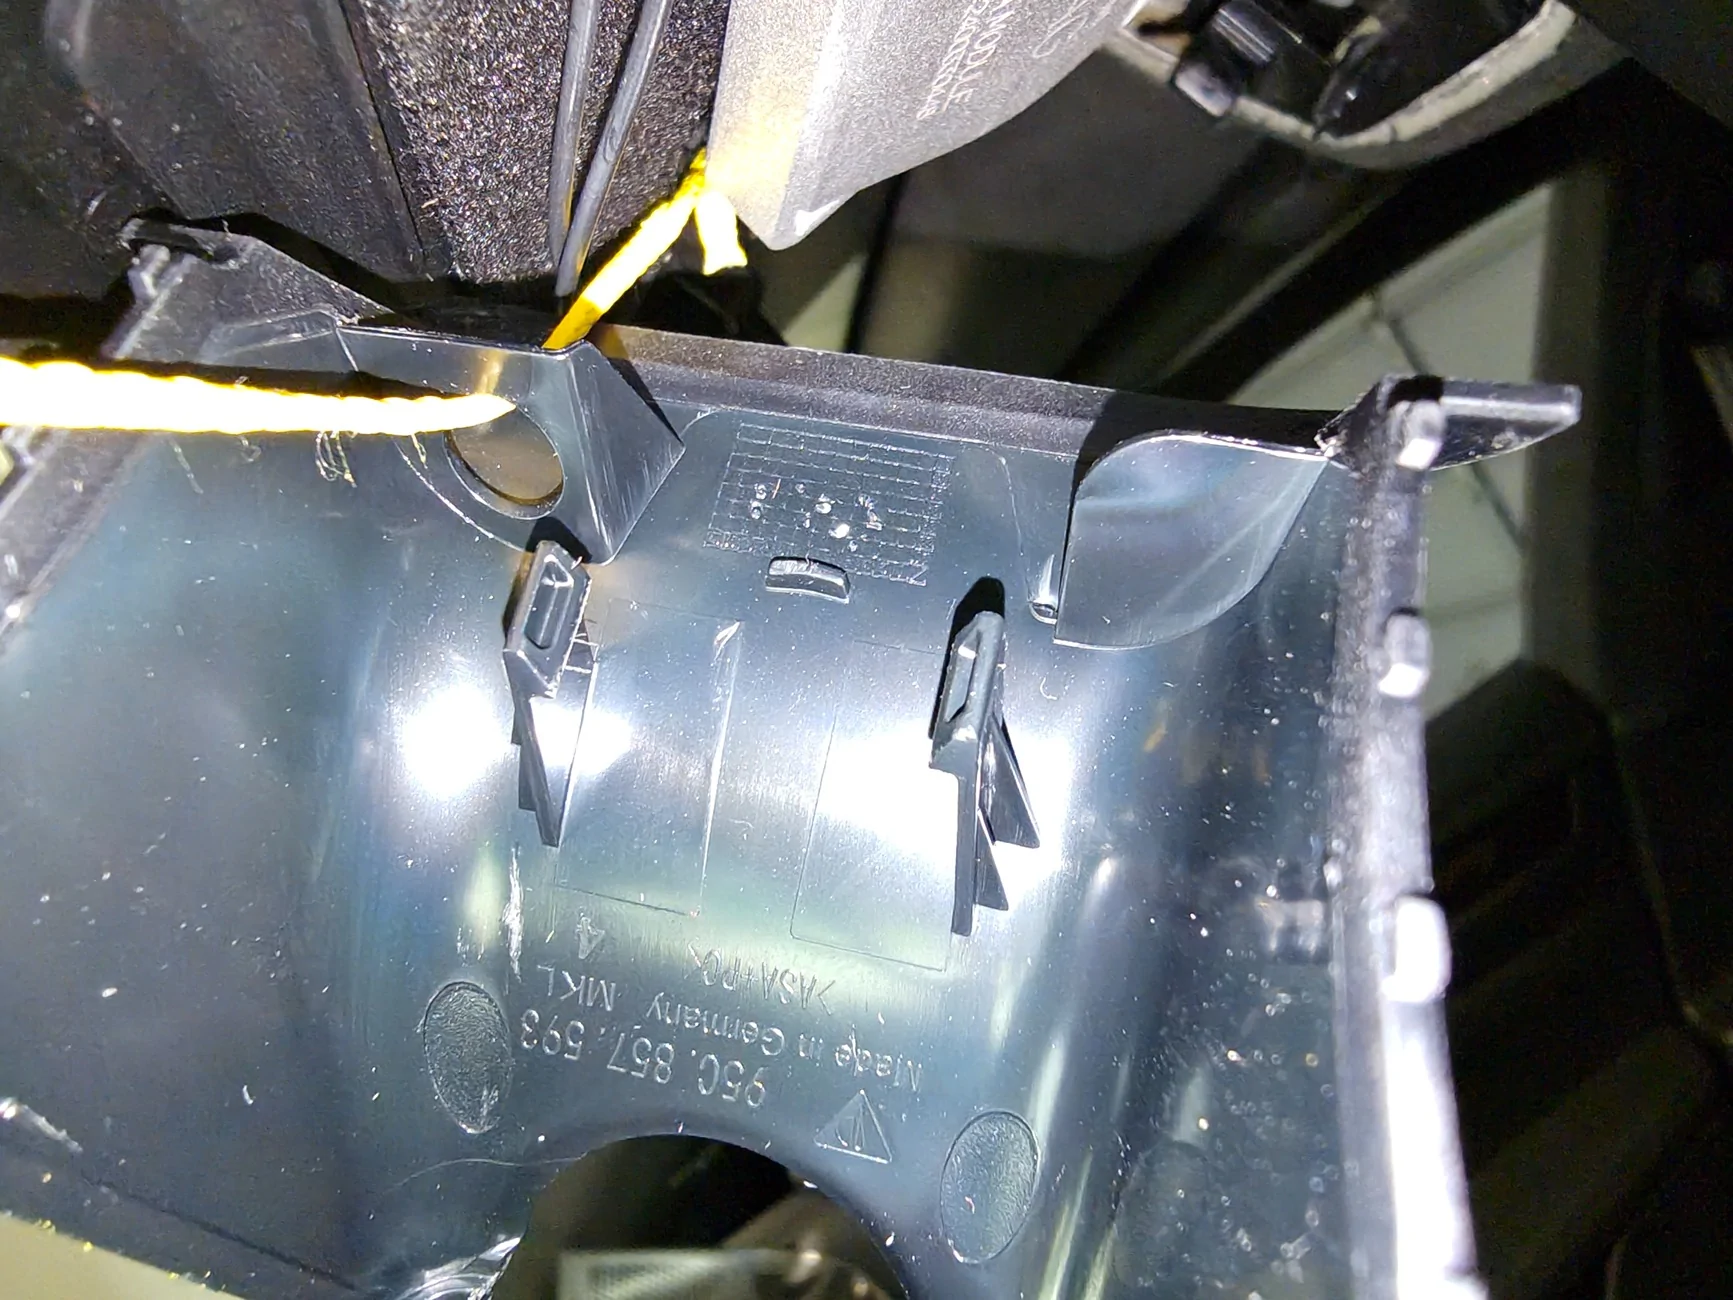
This is the inside of that trim peice for reference on where the clips are. red are the clips, green is a sort of silicone/rubber guide, and yellow is a tether that holds the trim to the car in an accident :
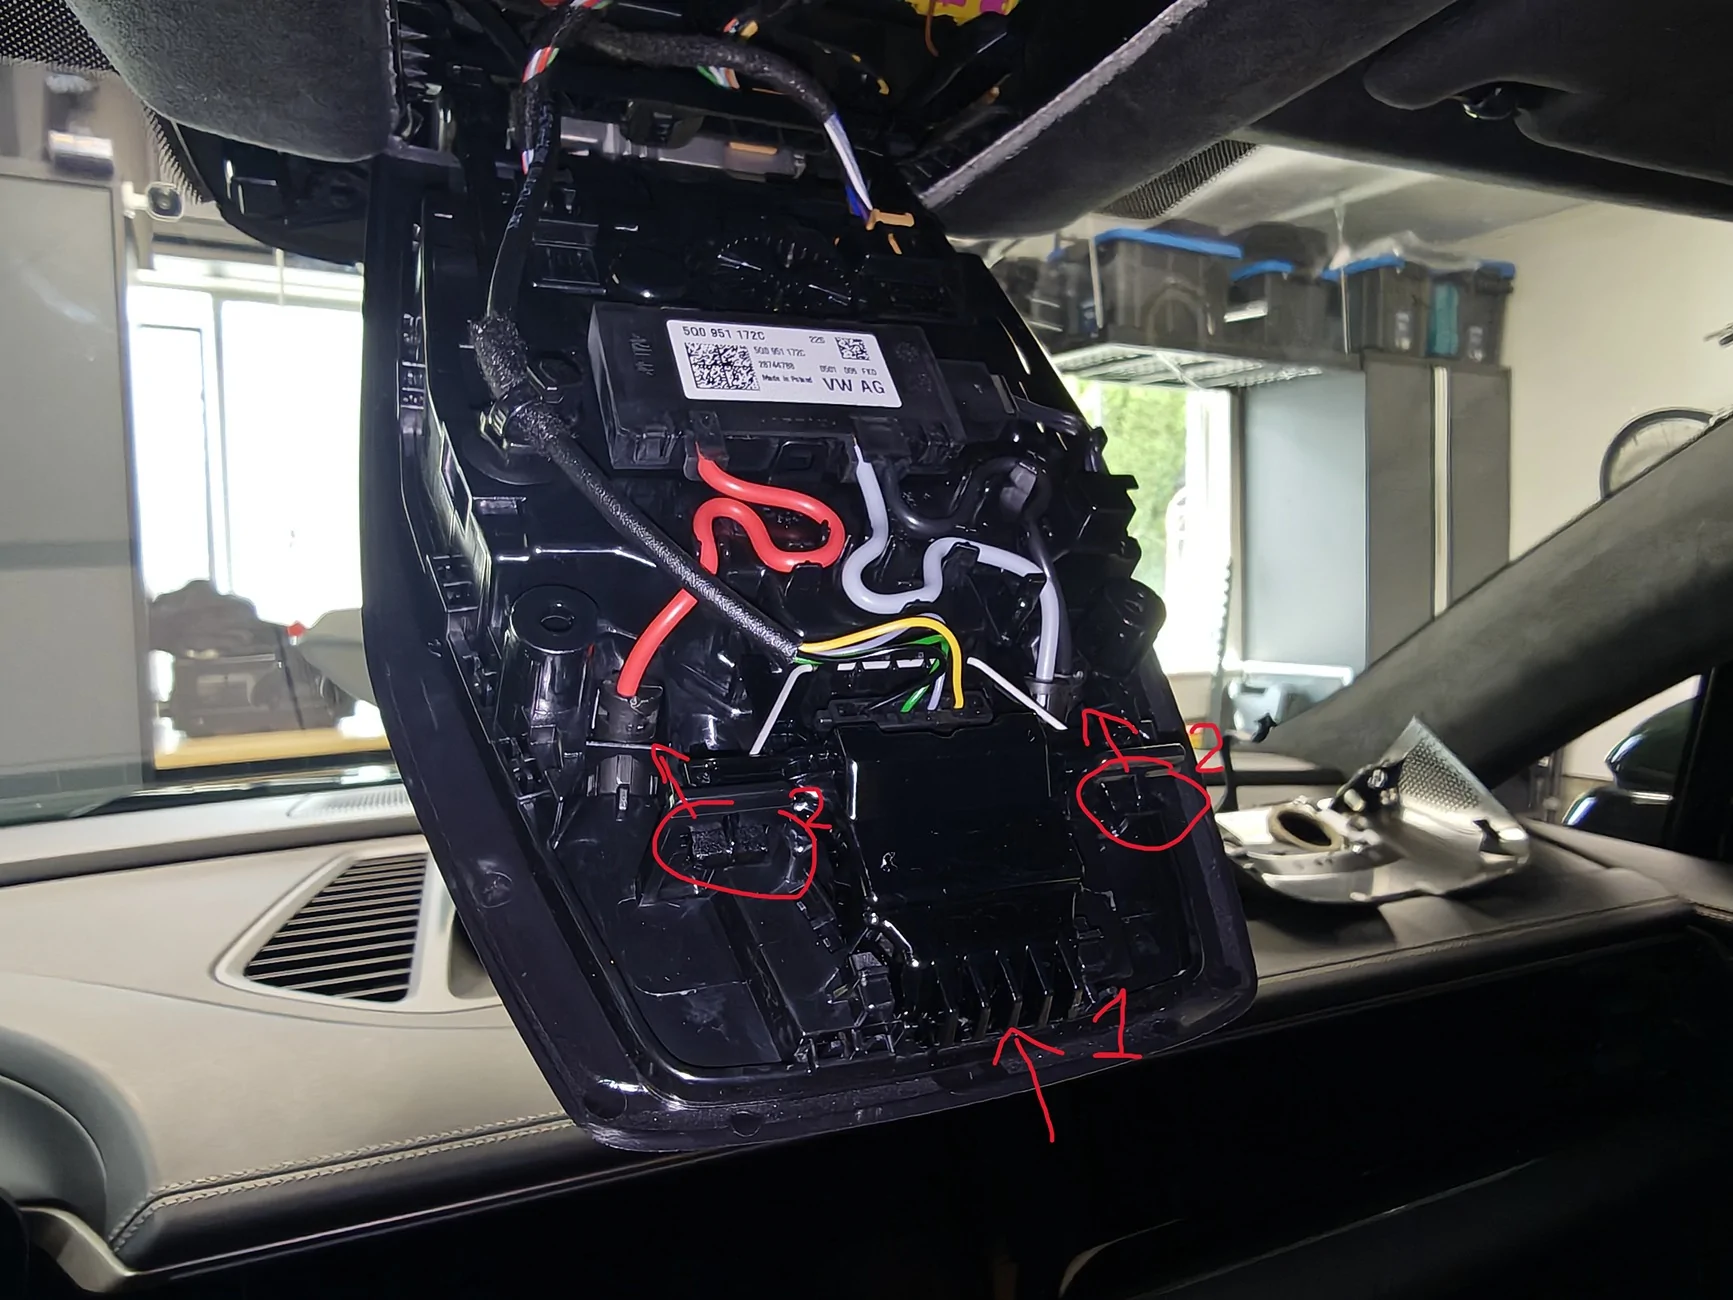
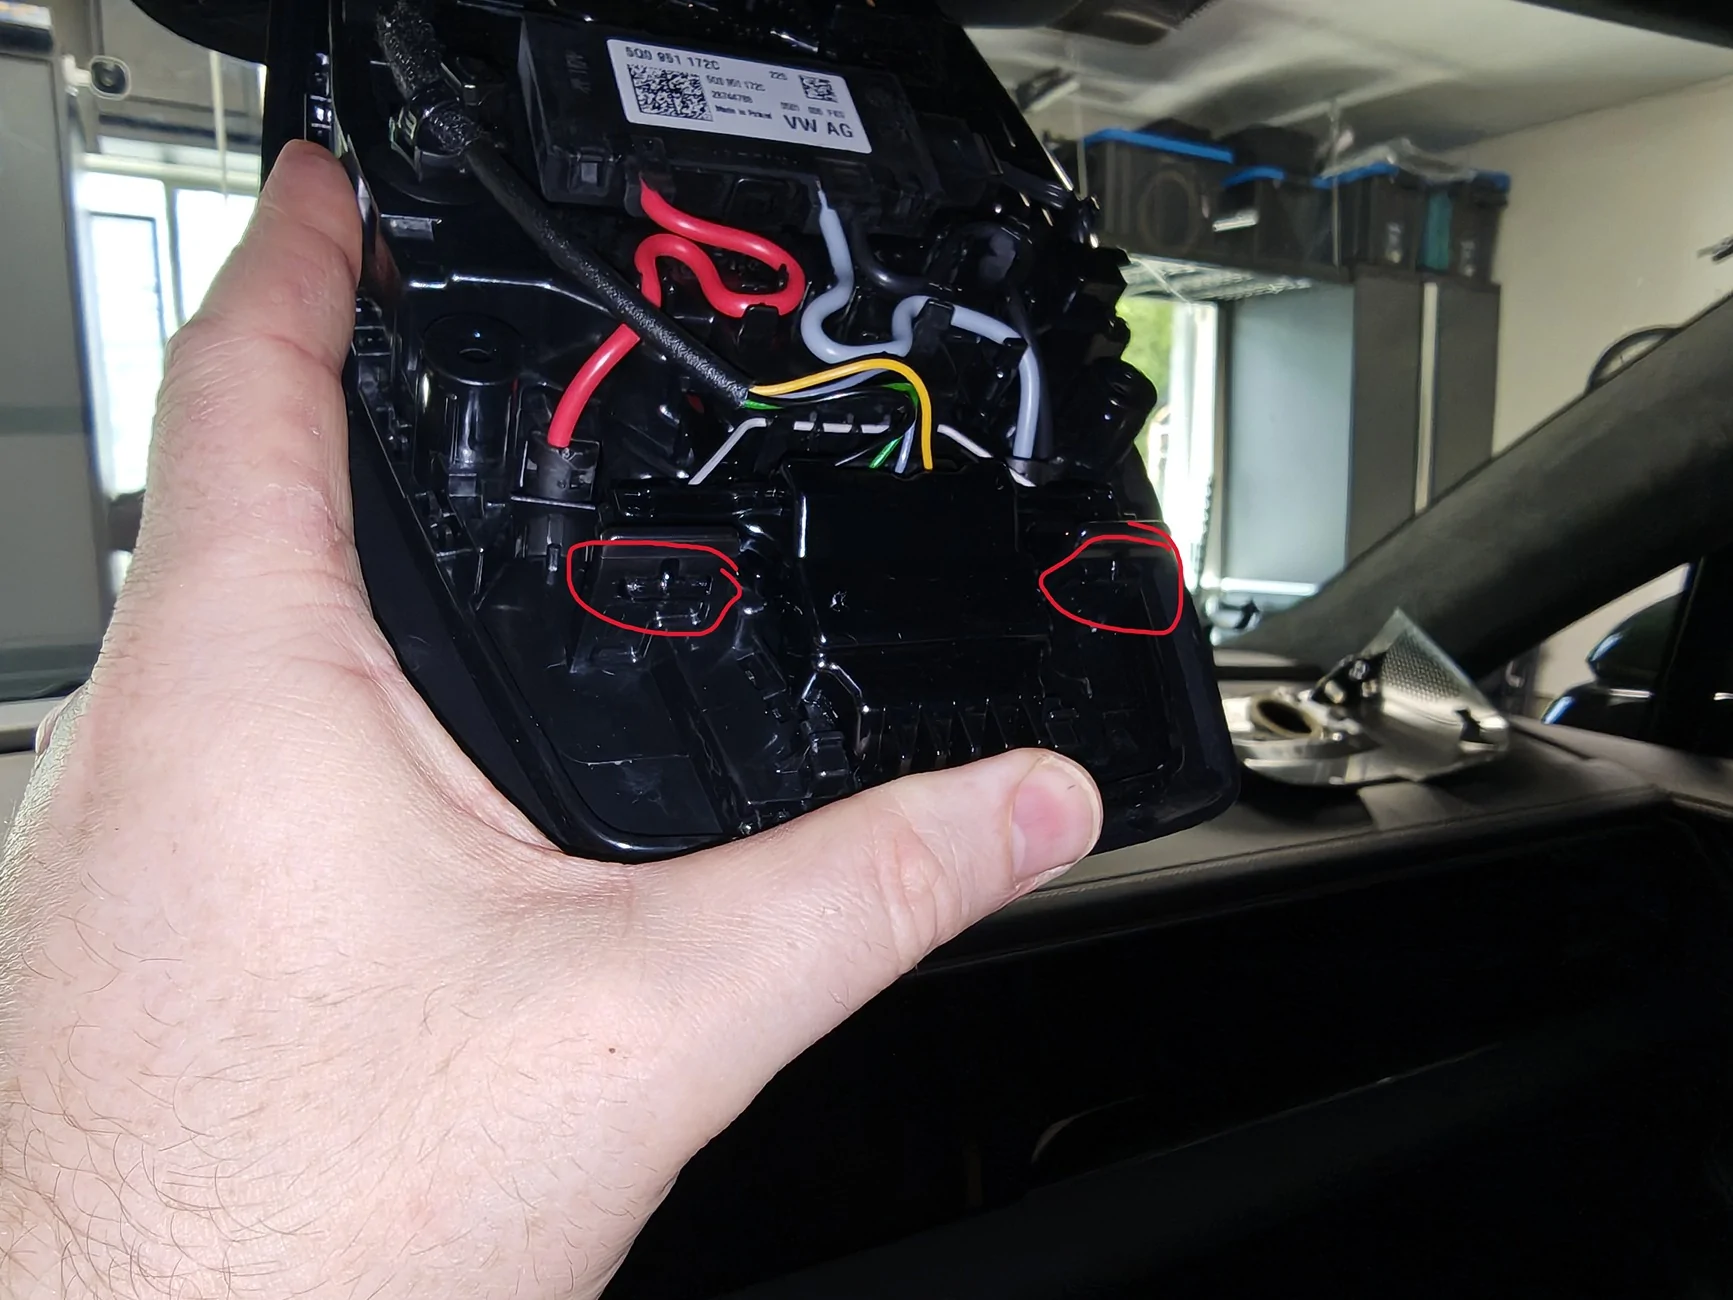
2- Lower the main overhead console. This is where that cayenne thread has bad information, do not start trying to pry it off, the outer trim can be removed, but you don't want to do that. the part labeled (1.) in the photo below is actually a spring loaded switch that pushes inward, it disengages the two tabs (2.). Just grab the larger metal pry tool from the set above, insert the flat end in the direction of the arrow and push the switch in. it does not need much force and disengages very easily when pushed correctly. The unit then swings down on a hinge and exposes the pre-wire connectors.
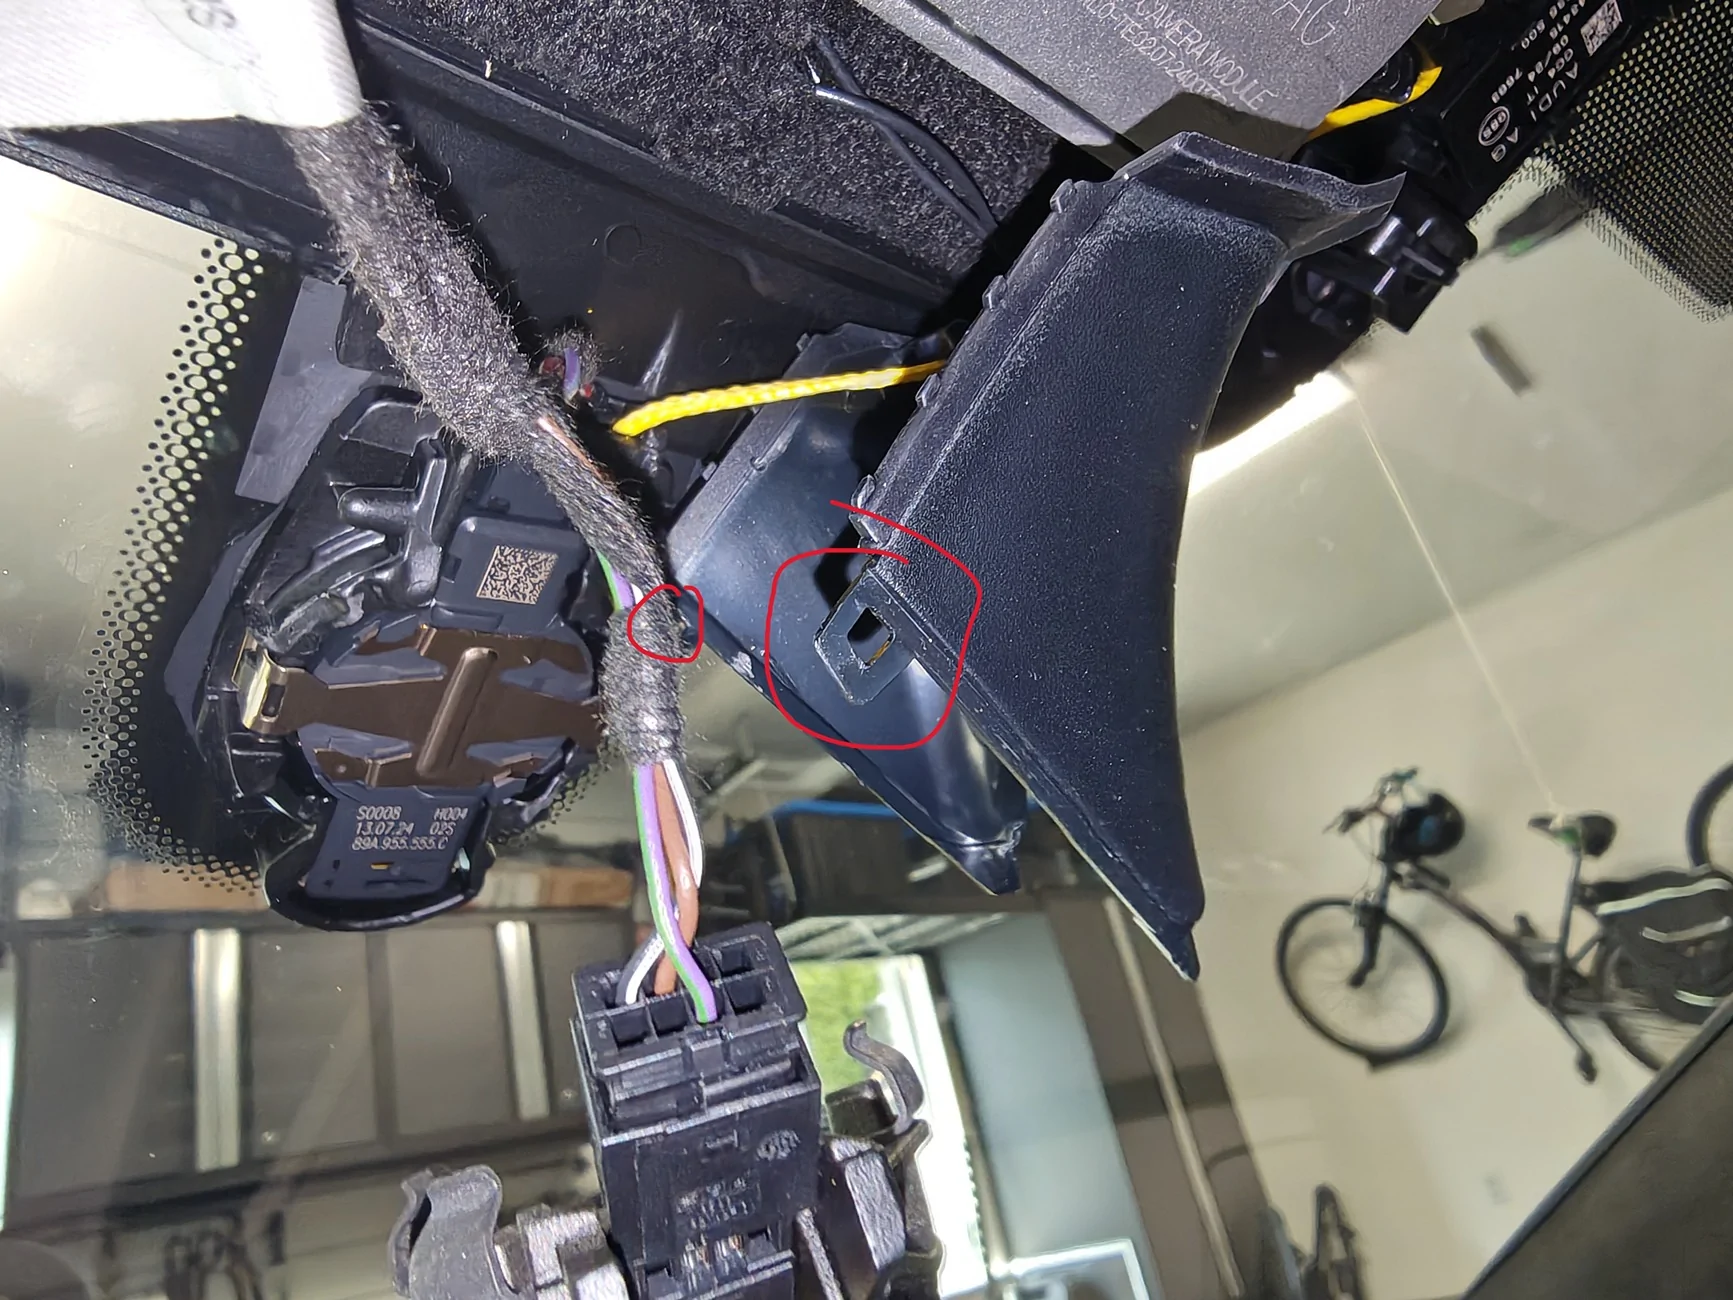
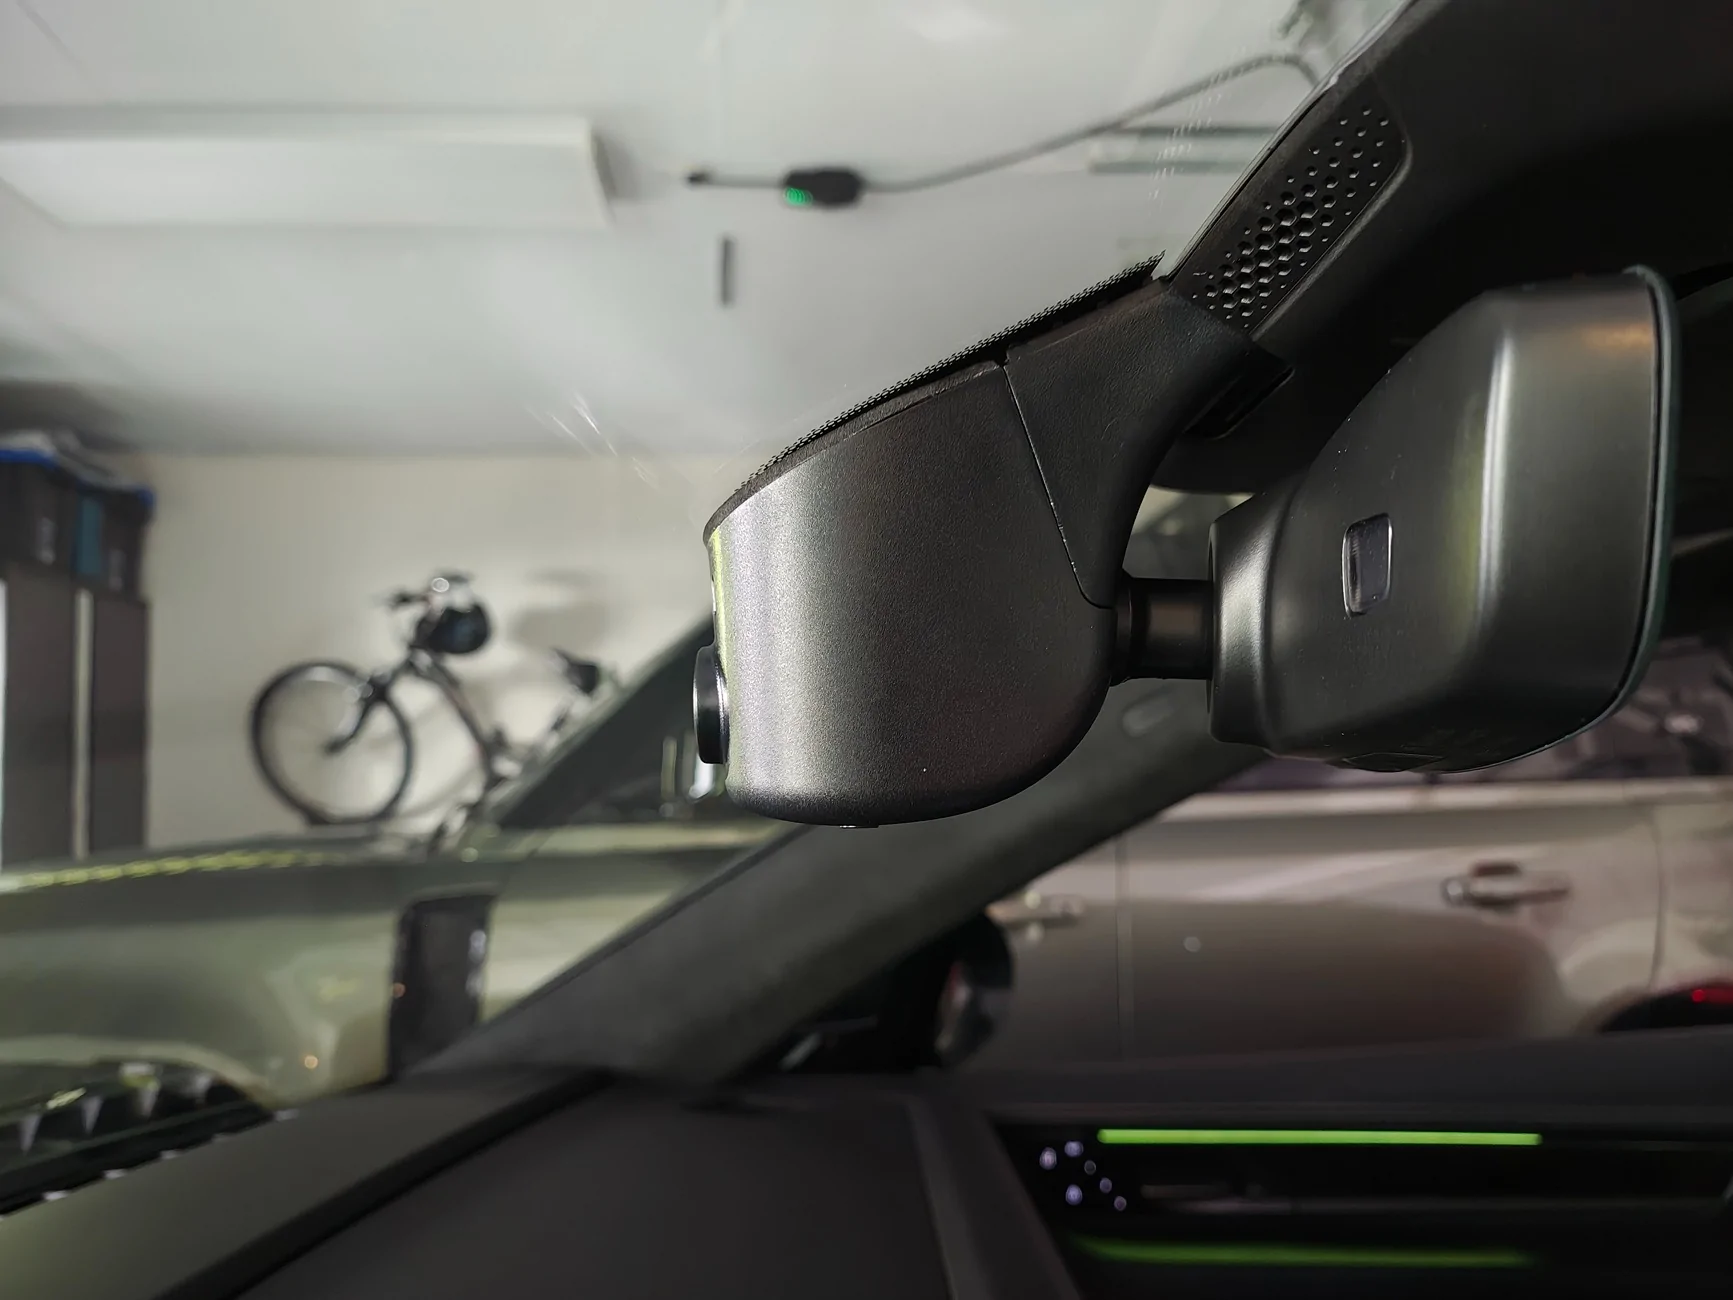
3- Next remove the rear view mirror (you could do this before the console if desired). First step is to remove the inner windscreen trim (not the part the fitcamx replaces, that is the outer trim.). to do this pry the top corners of the outer trim outward to release the tabs on the inner trim, then give it a firm pull downward and it should be off. It is tethered to the car, just leave it dangling.
4- Remove the rear view mirror itself from the car. DO NOT try to remove the outer trim, I couldn't figure out why, but it is very difficult to remove with the mirror on the car. I wasted a lot of time trying to get it off, was surprised I didn't break it honestly. After removing the mirror it comes off easily. Just grab the base of the mirror itself, and rotate it counter clockwise (lefty loosey), it'll move maybe a 1/4 turn and can then be pulled down. it has a tether and will dangled from it no problem. Below is it dangling with the two lines being where I routed the FitCAMX's two wires. The red line is where I routed the main dashcam wire, and the green line is where I ran the rear camera wire. There is a very tempting looking hole for the rear view mirror wiring connector, but there just wasn't quite enough room to fit either of the fitcamx connectors through it. after deciding on the route for the wires pop the fitcamx onto the mirror, then put the mirror back on the car. Pretty straight forward, i hooked the bottom two prongs on first, pushed the top flush, then rotated right/clockwise until it clicked back in place.
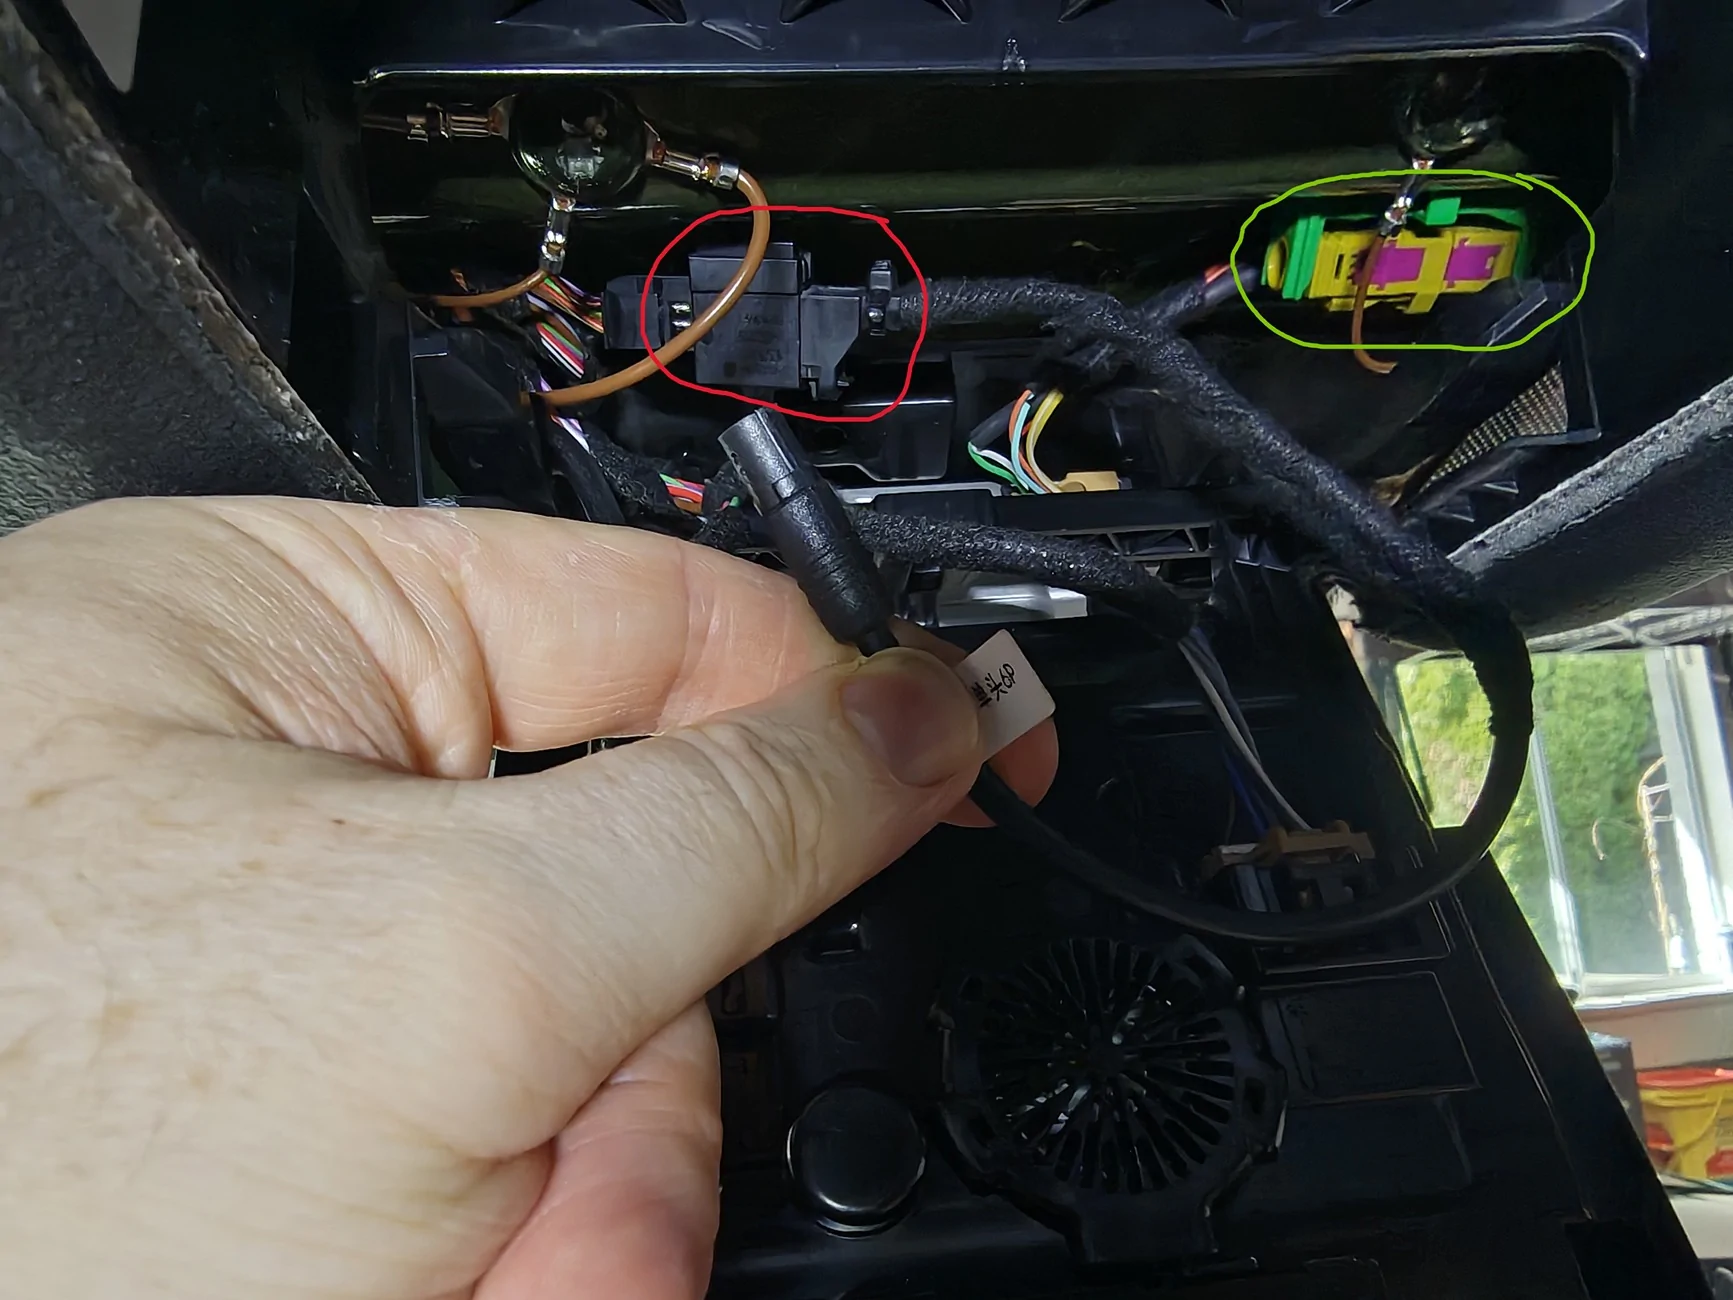
5- Connect the fitcamx -> porsche prewire adapter, and feed it and the rear camera connector through to the main overhead console. There is plenty of room, and the adapter is the perfect length. highlighted the pre-wire connector in the car in red, the fitcamx adapter clicks in very easily. the green highlight is the rear camera FAKRA connector, we won't need to use this.
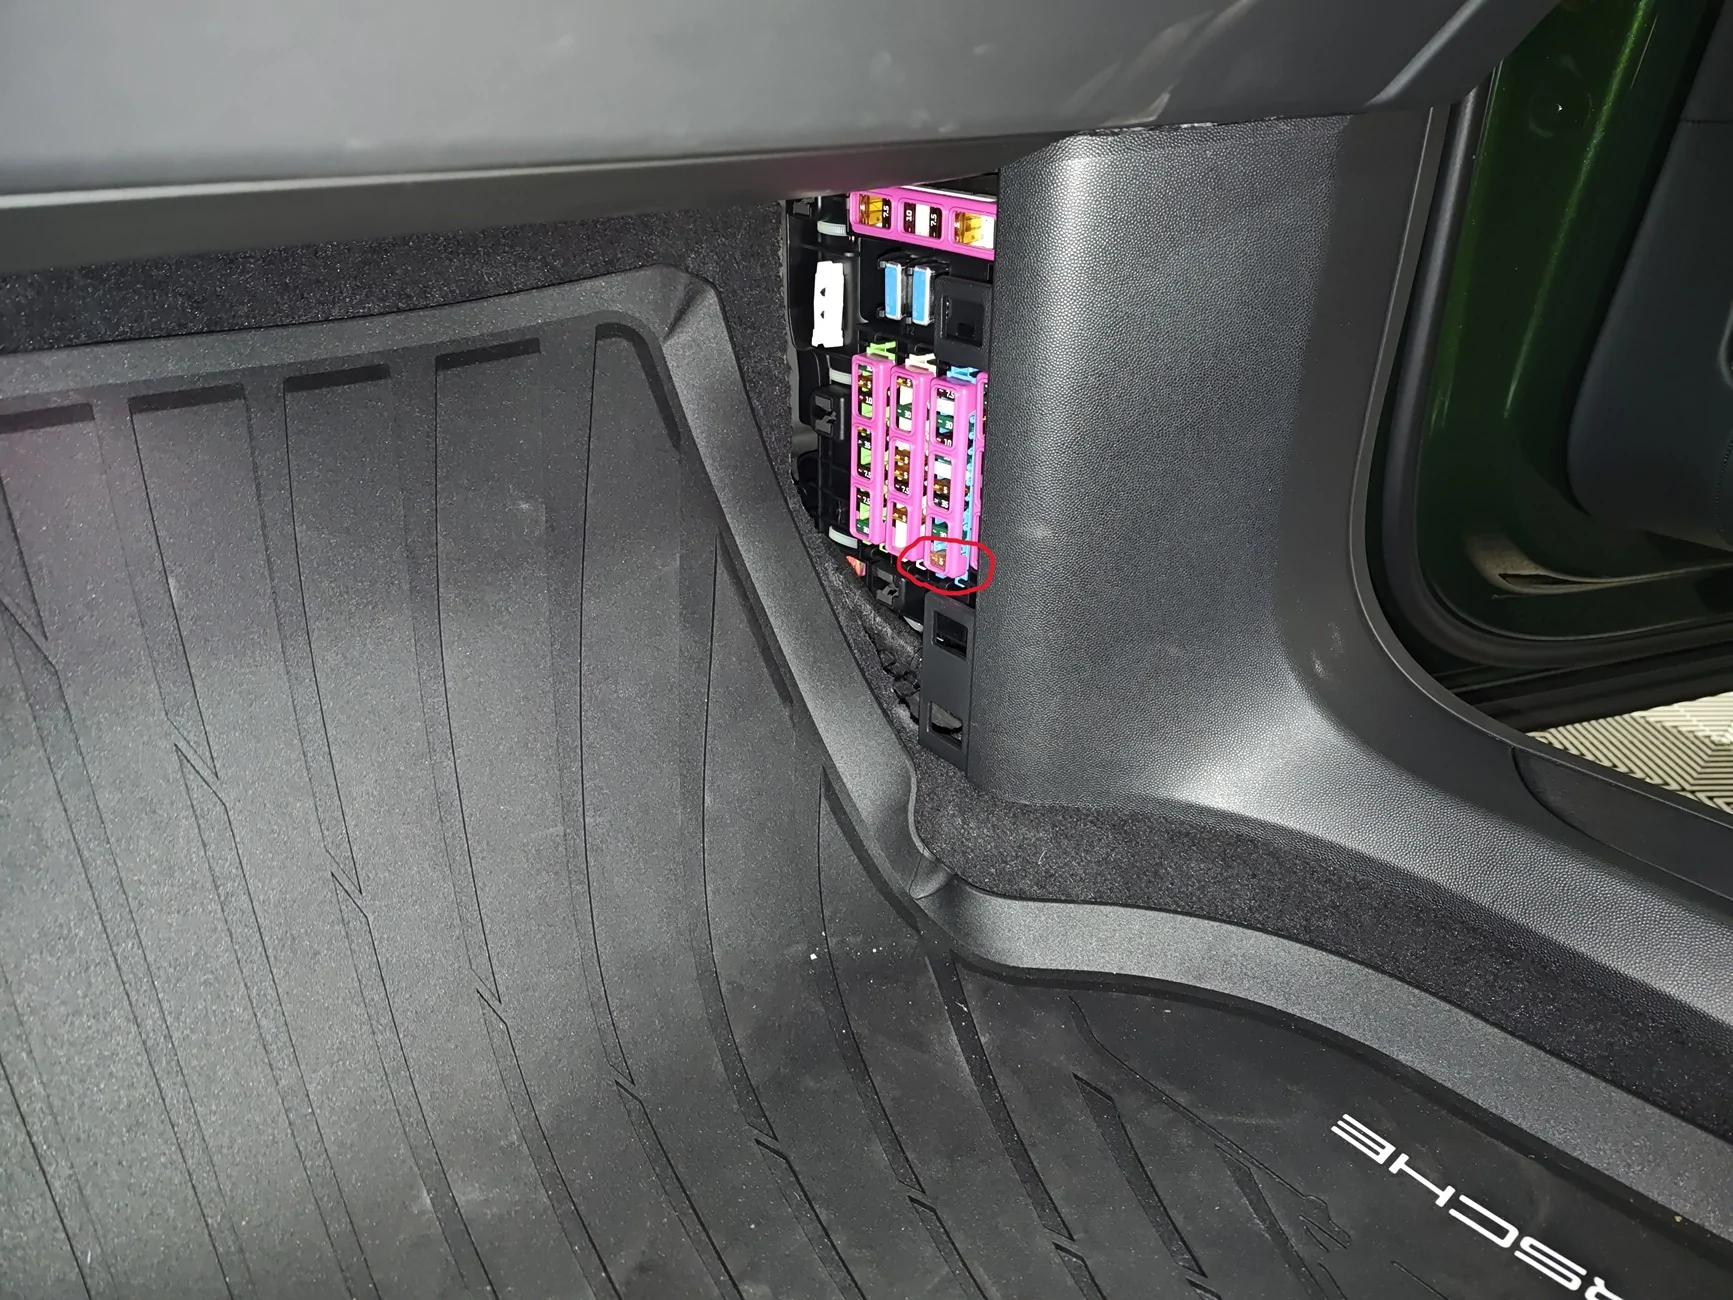
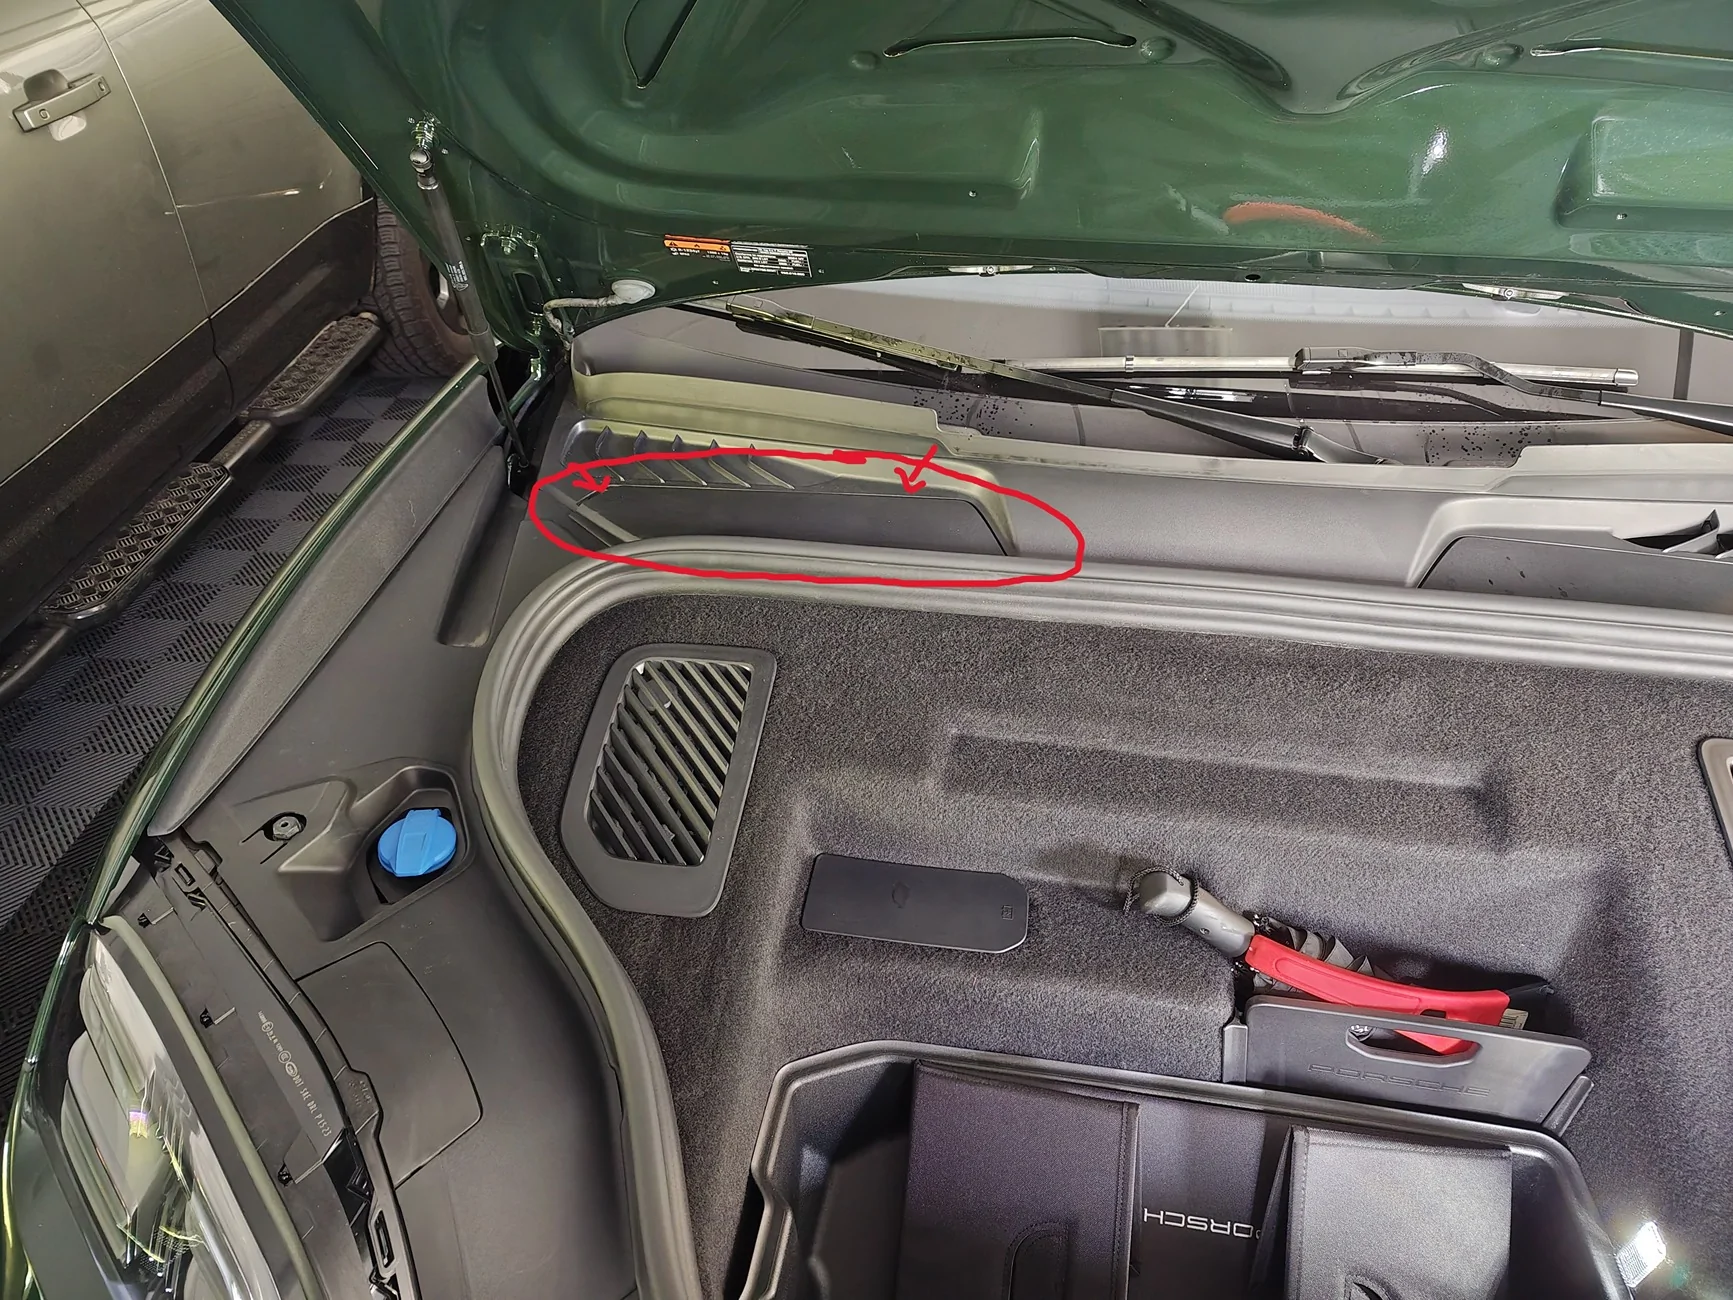
6- Install the dashcam fuses as per the official porsche prewire instructions here : https://static.nhtsa.gov/odi/tsbs/2024/MC-11011672-0001.pdf. the 5A fuse box is located in the passenger footwell, very easy to access, i circled where the fuse goes. the 10A fuse goes in the fusebox in the frunk, remove the cover that is circled, it goes in slot 1 which is labeled, and there is a diagram of it's location in the instructions.
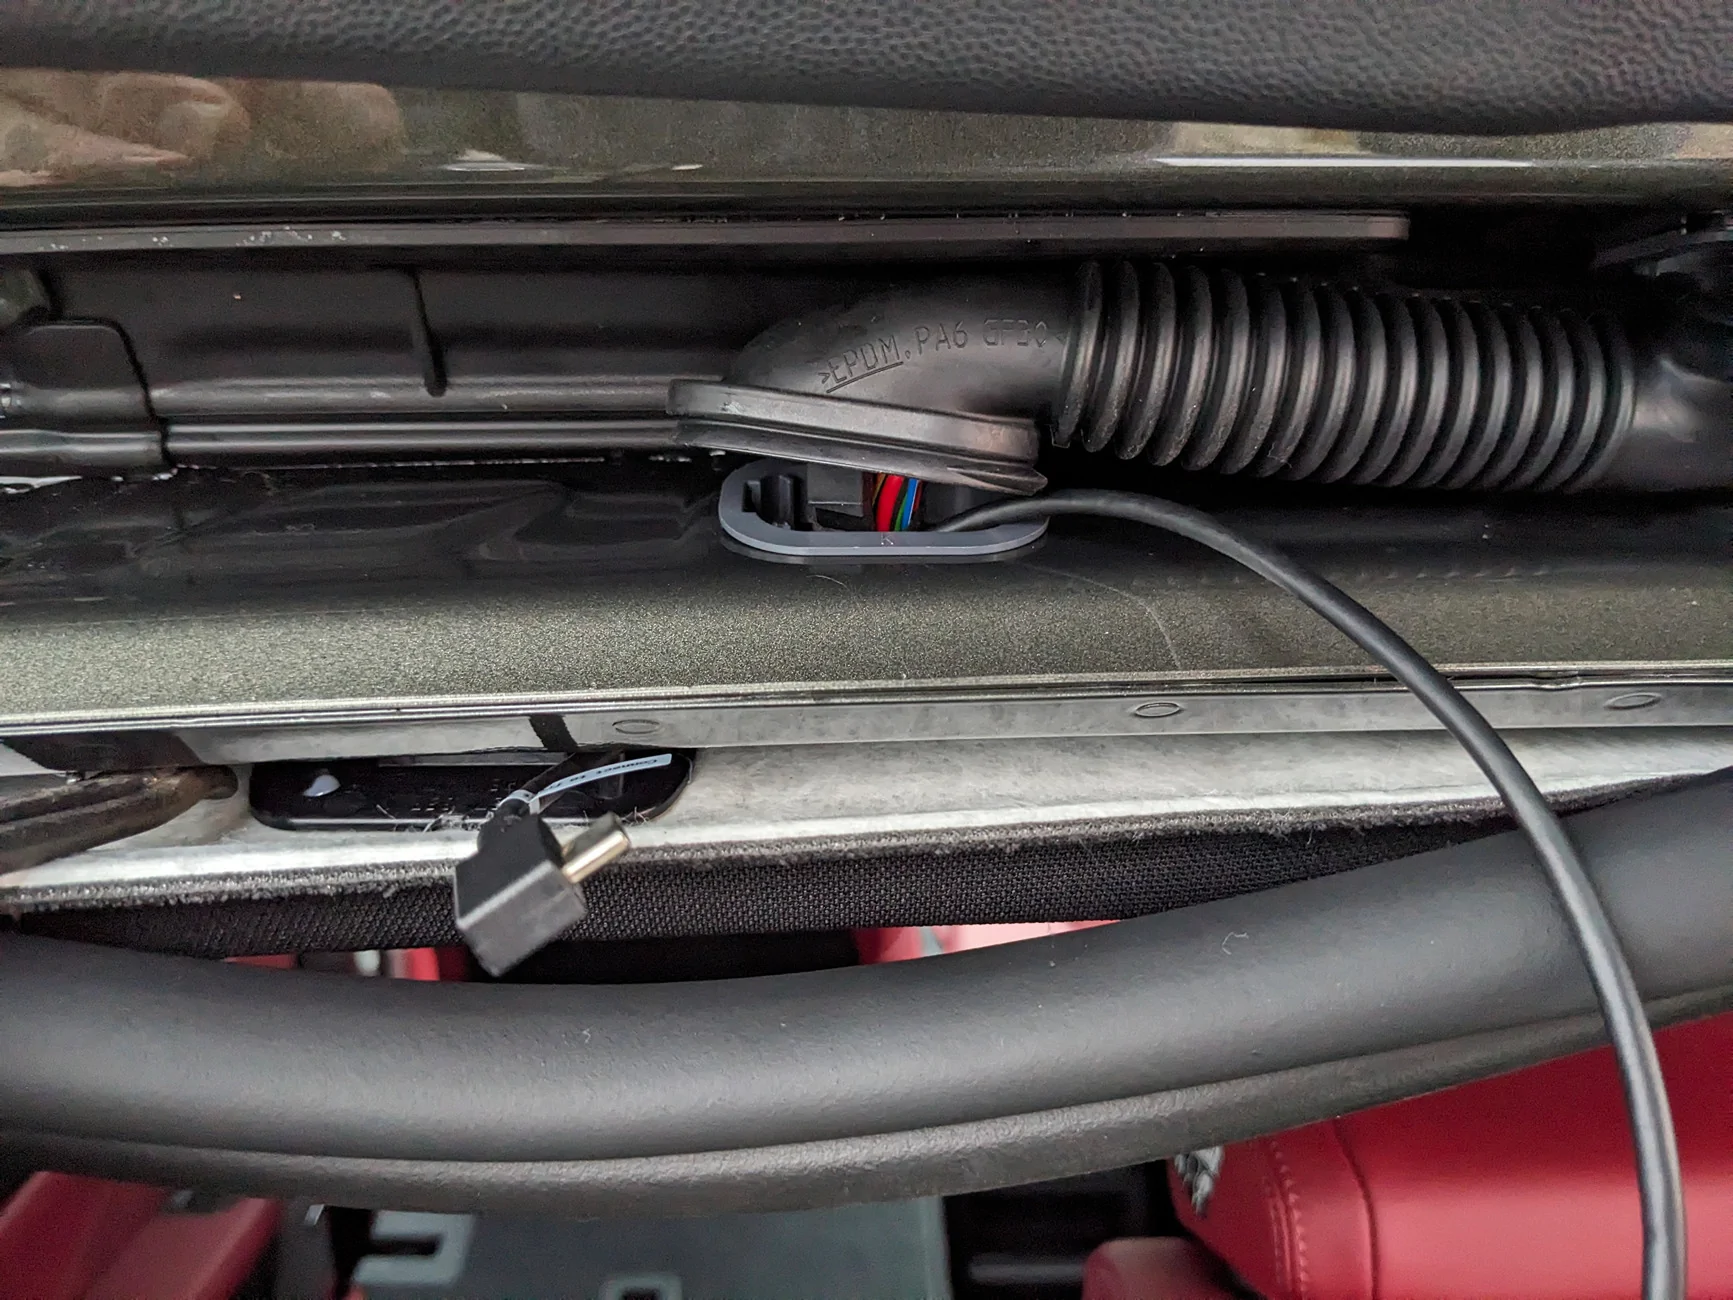
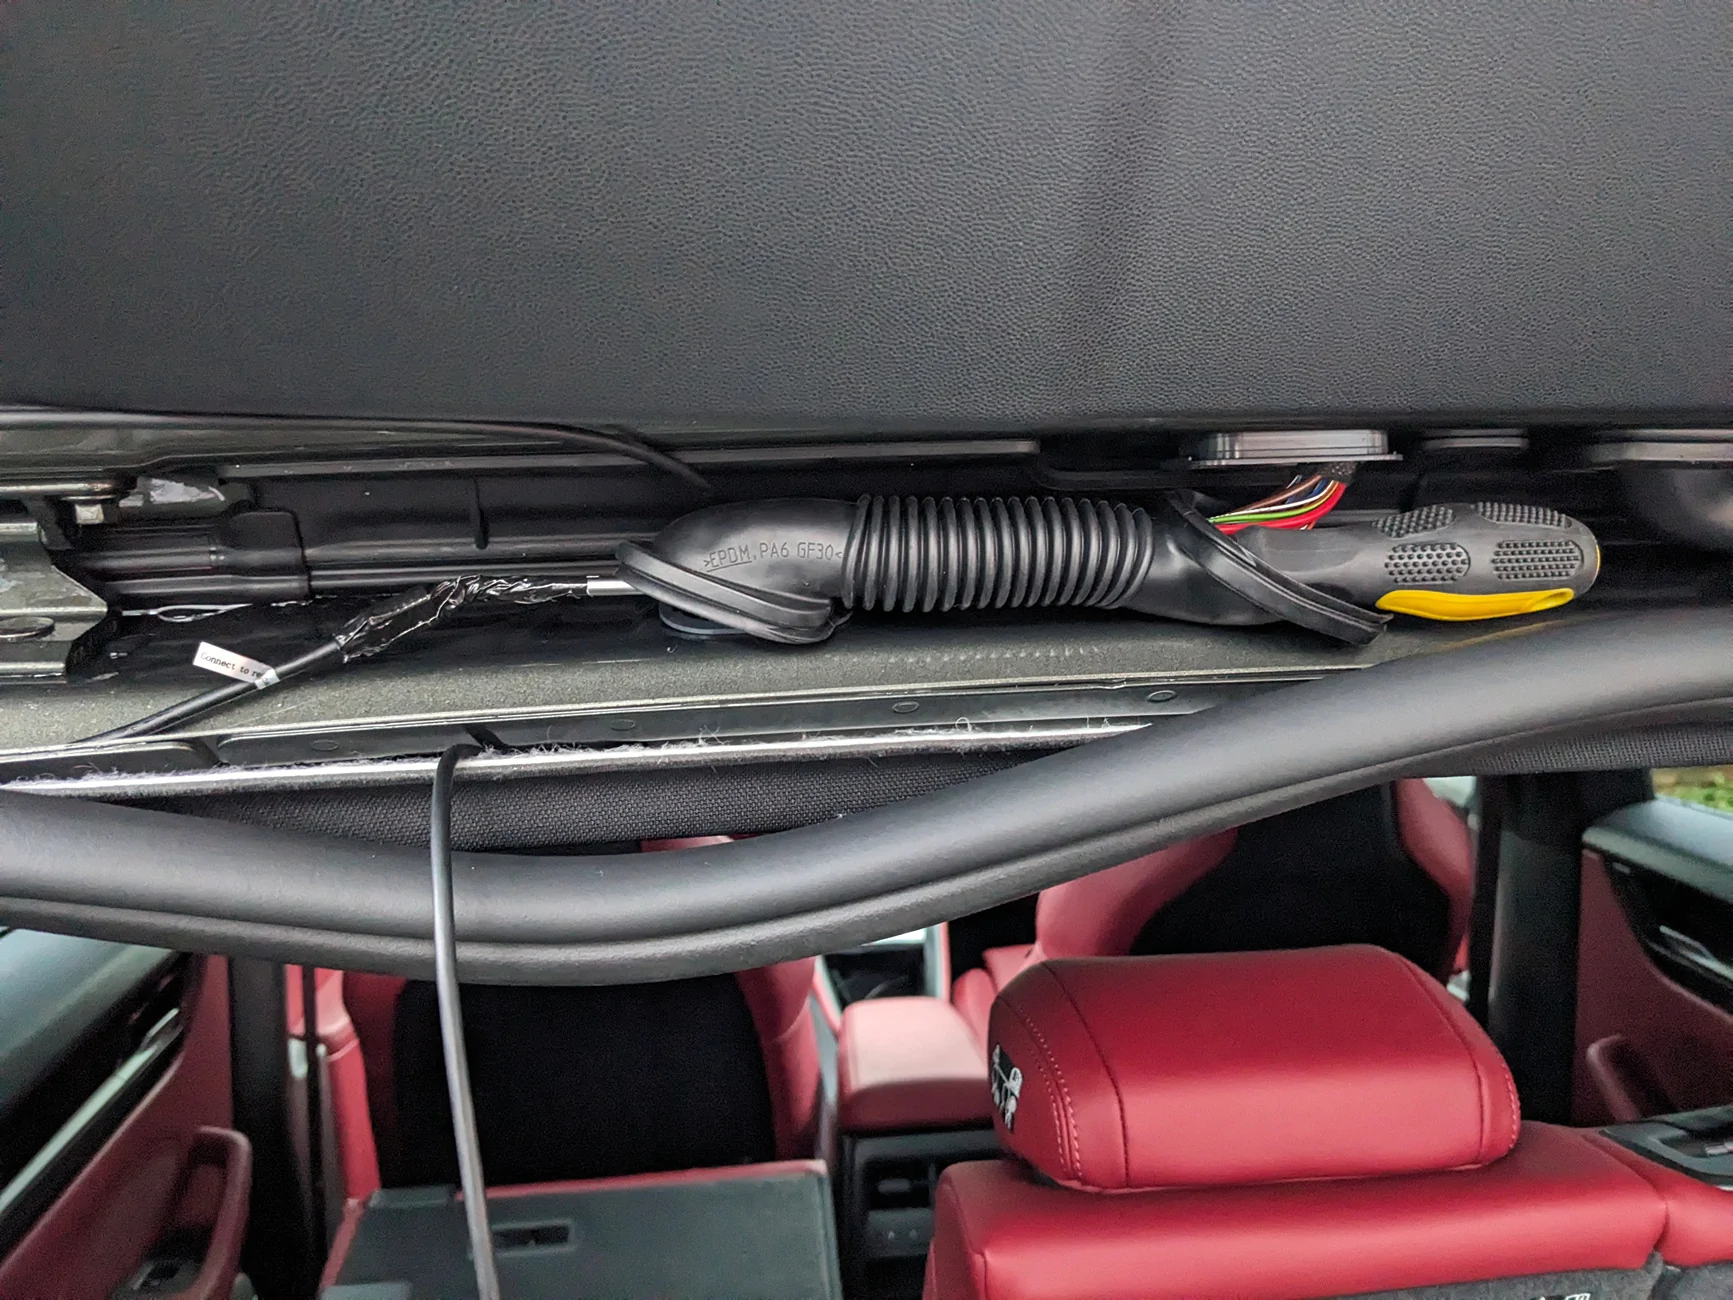
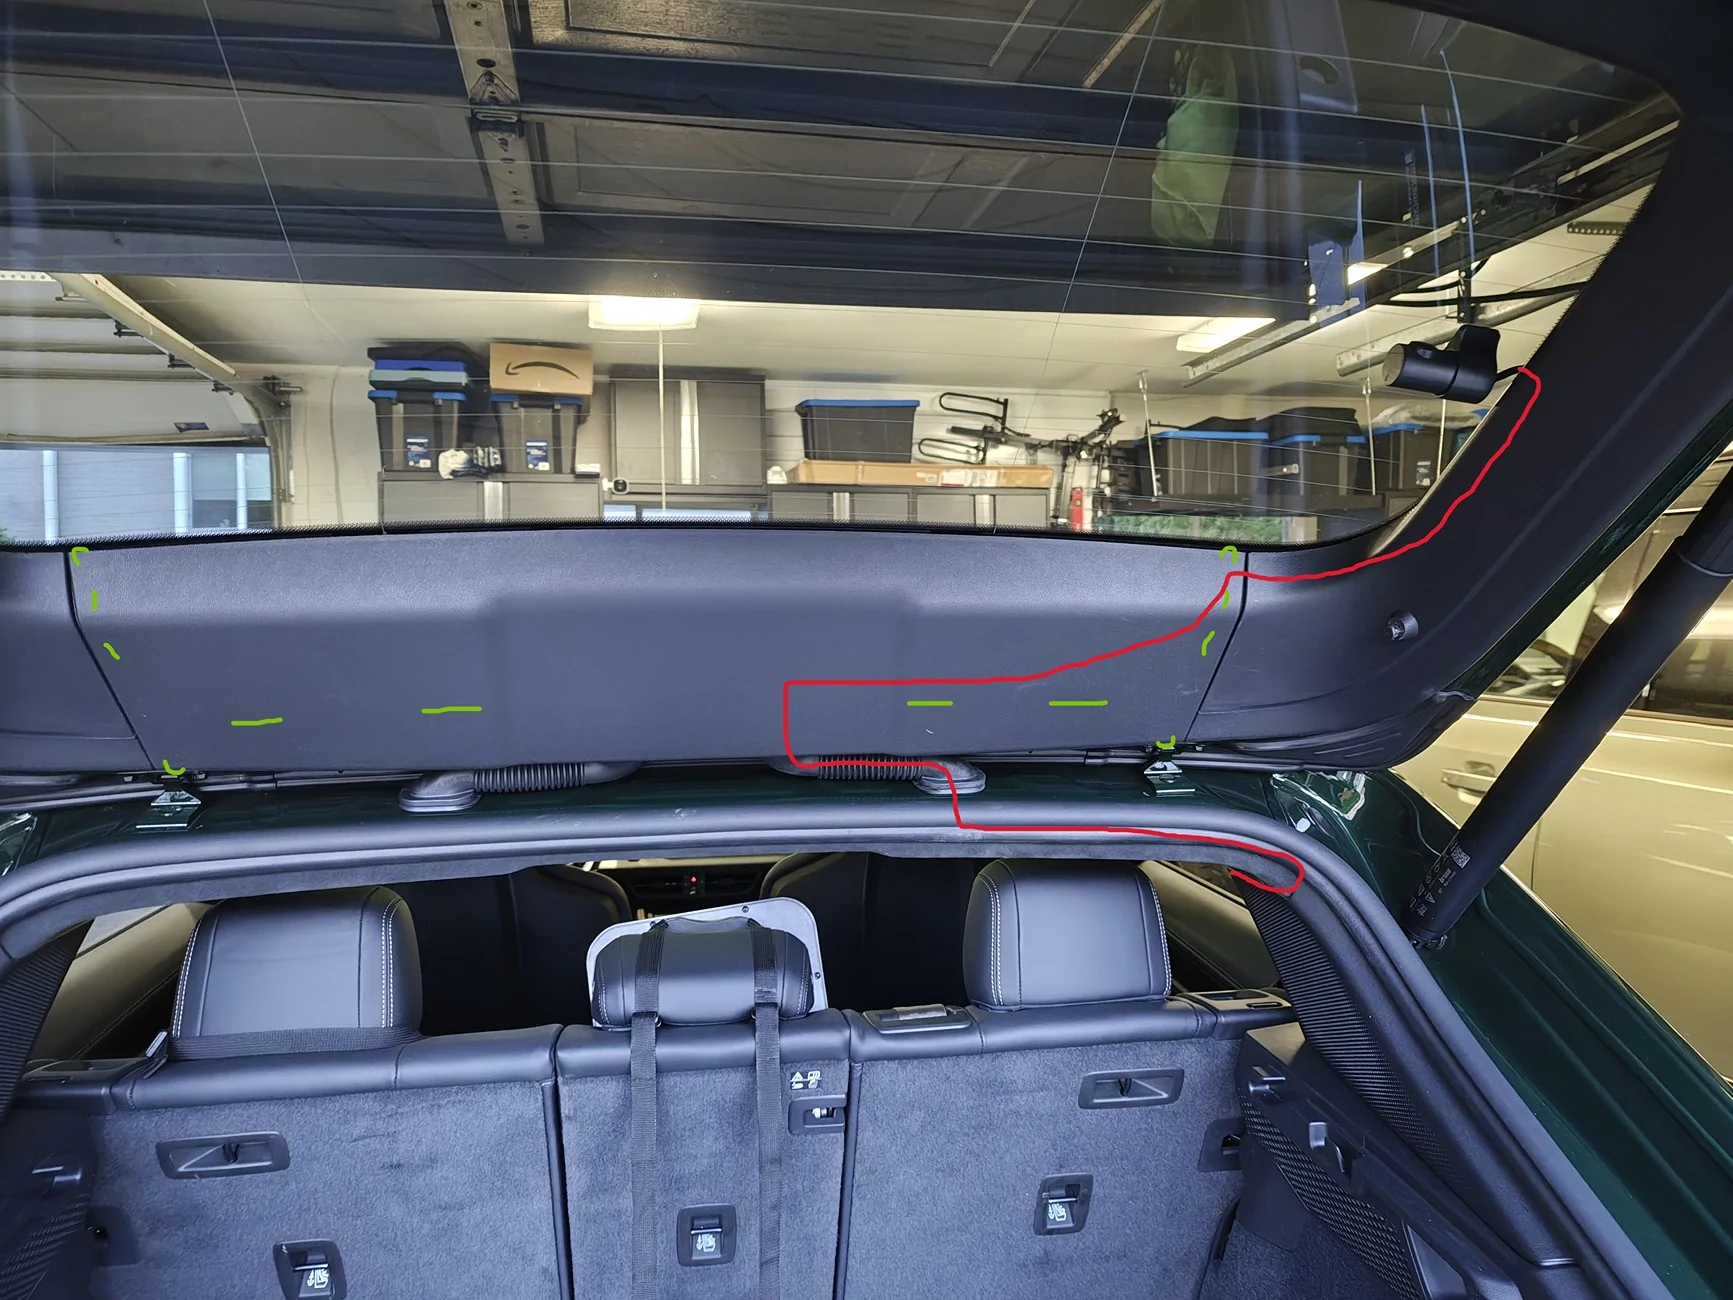
6- Run the rear camera wire along the passenger side of the car along the edge of the headliner. it tucks under the roof lining quite easily the whole way along. the B Pillar is a little fiddley, but quite straight forward. Given the rear pre-wire location on the side of the luggage compartment, there is no point to try and leverage it, it's faster to simply run the fitcamx wire. The only complication is getting it through the trunk door wiring channel. You'll need to pry off the rubber cover from the plastic base that is clipped into the frame of the car, do this for both ends of the channel. note to put these back after you pull the wire through you'll need to unclip the plastic base from the car, then pull the rubber channel back over the edges of the base, and finally clip the re-assembled part back into the car.
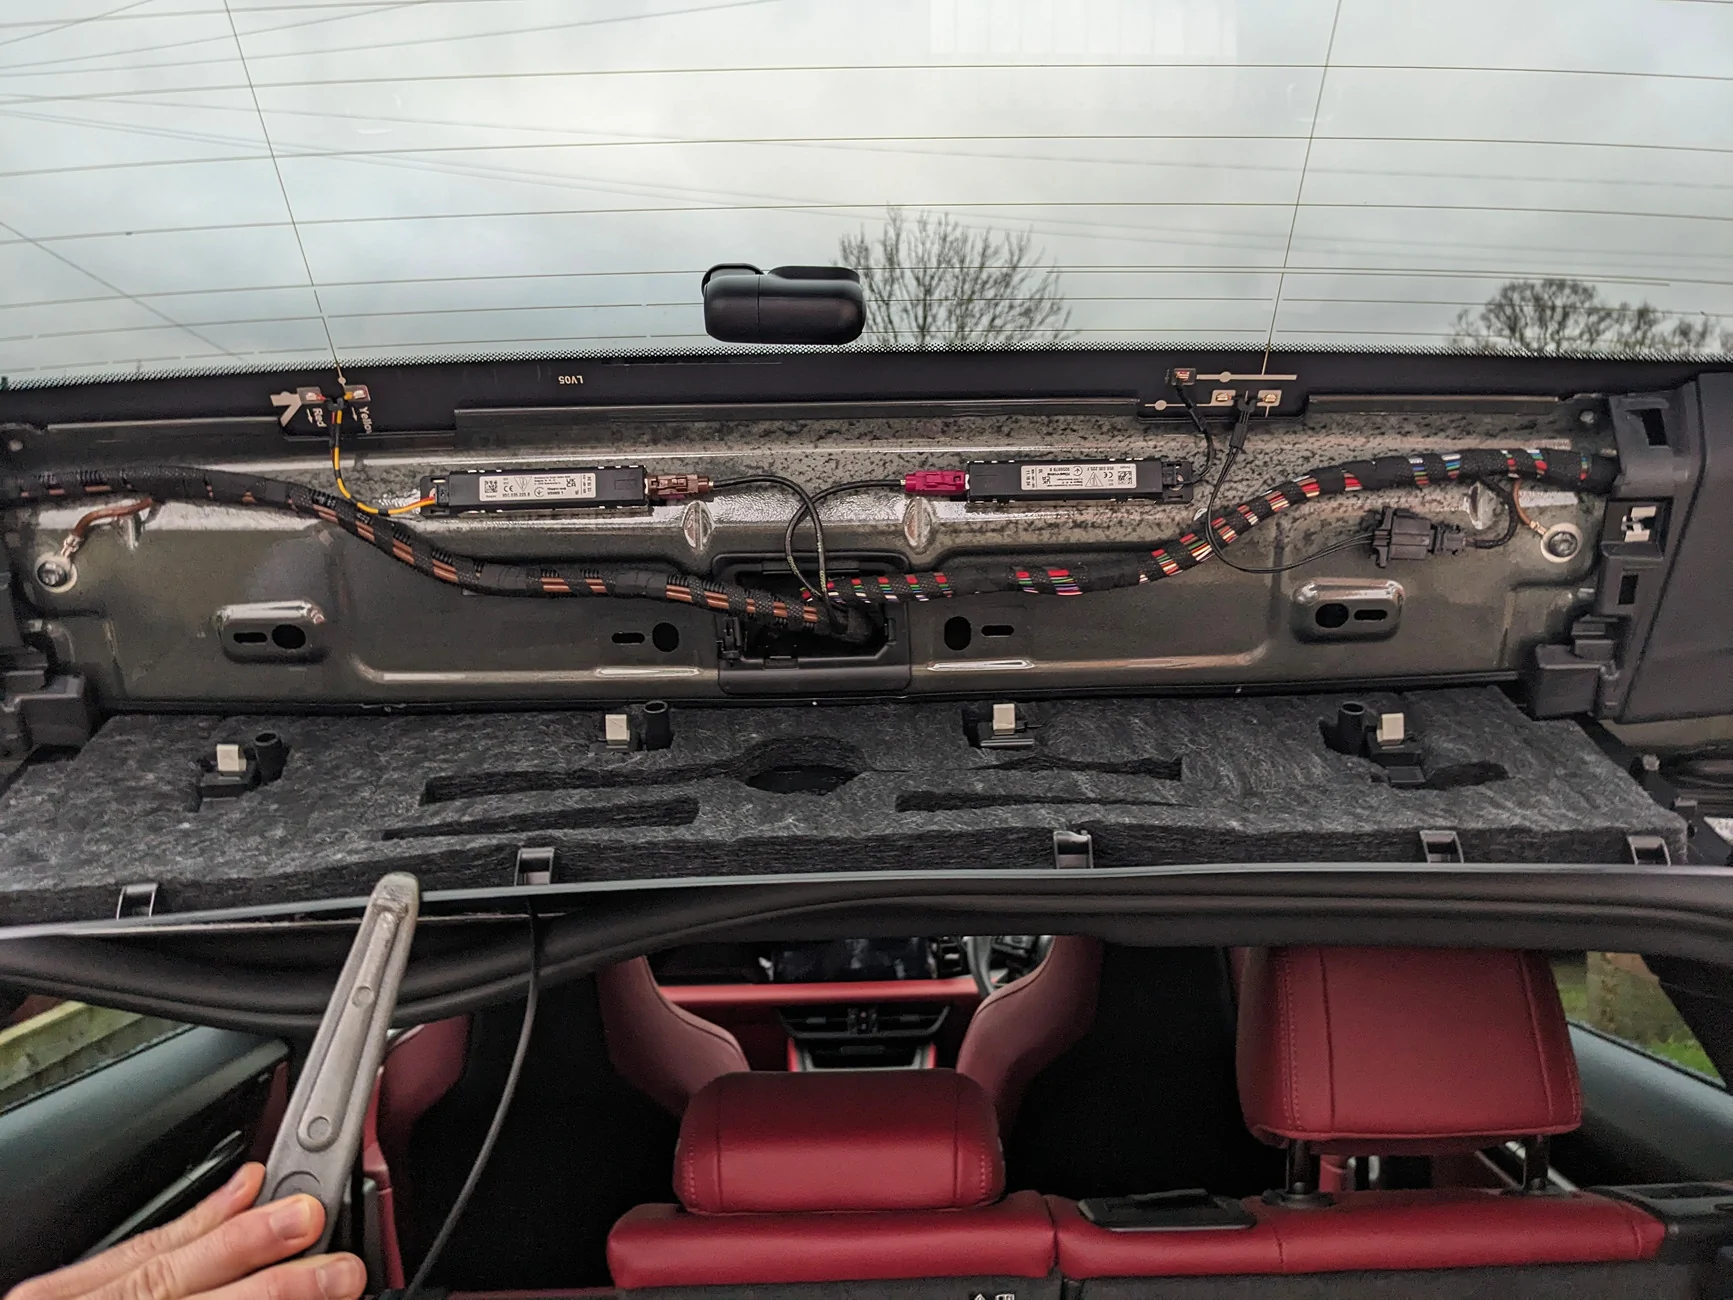
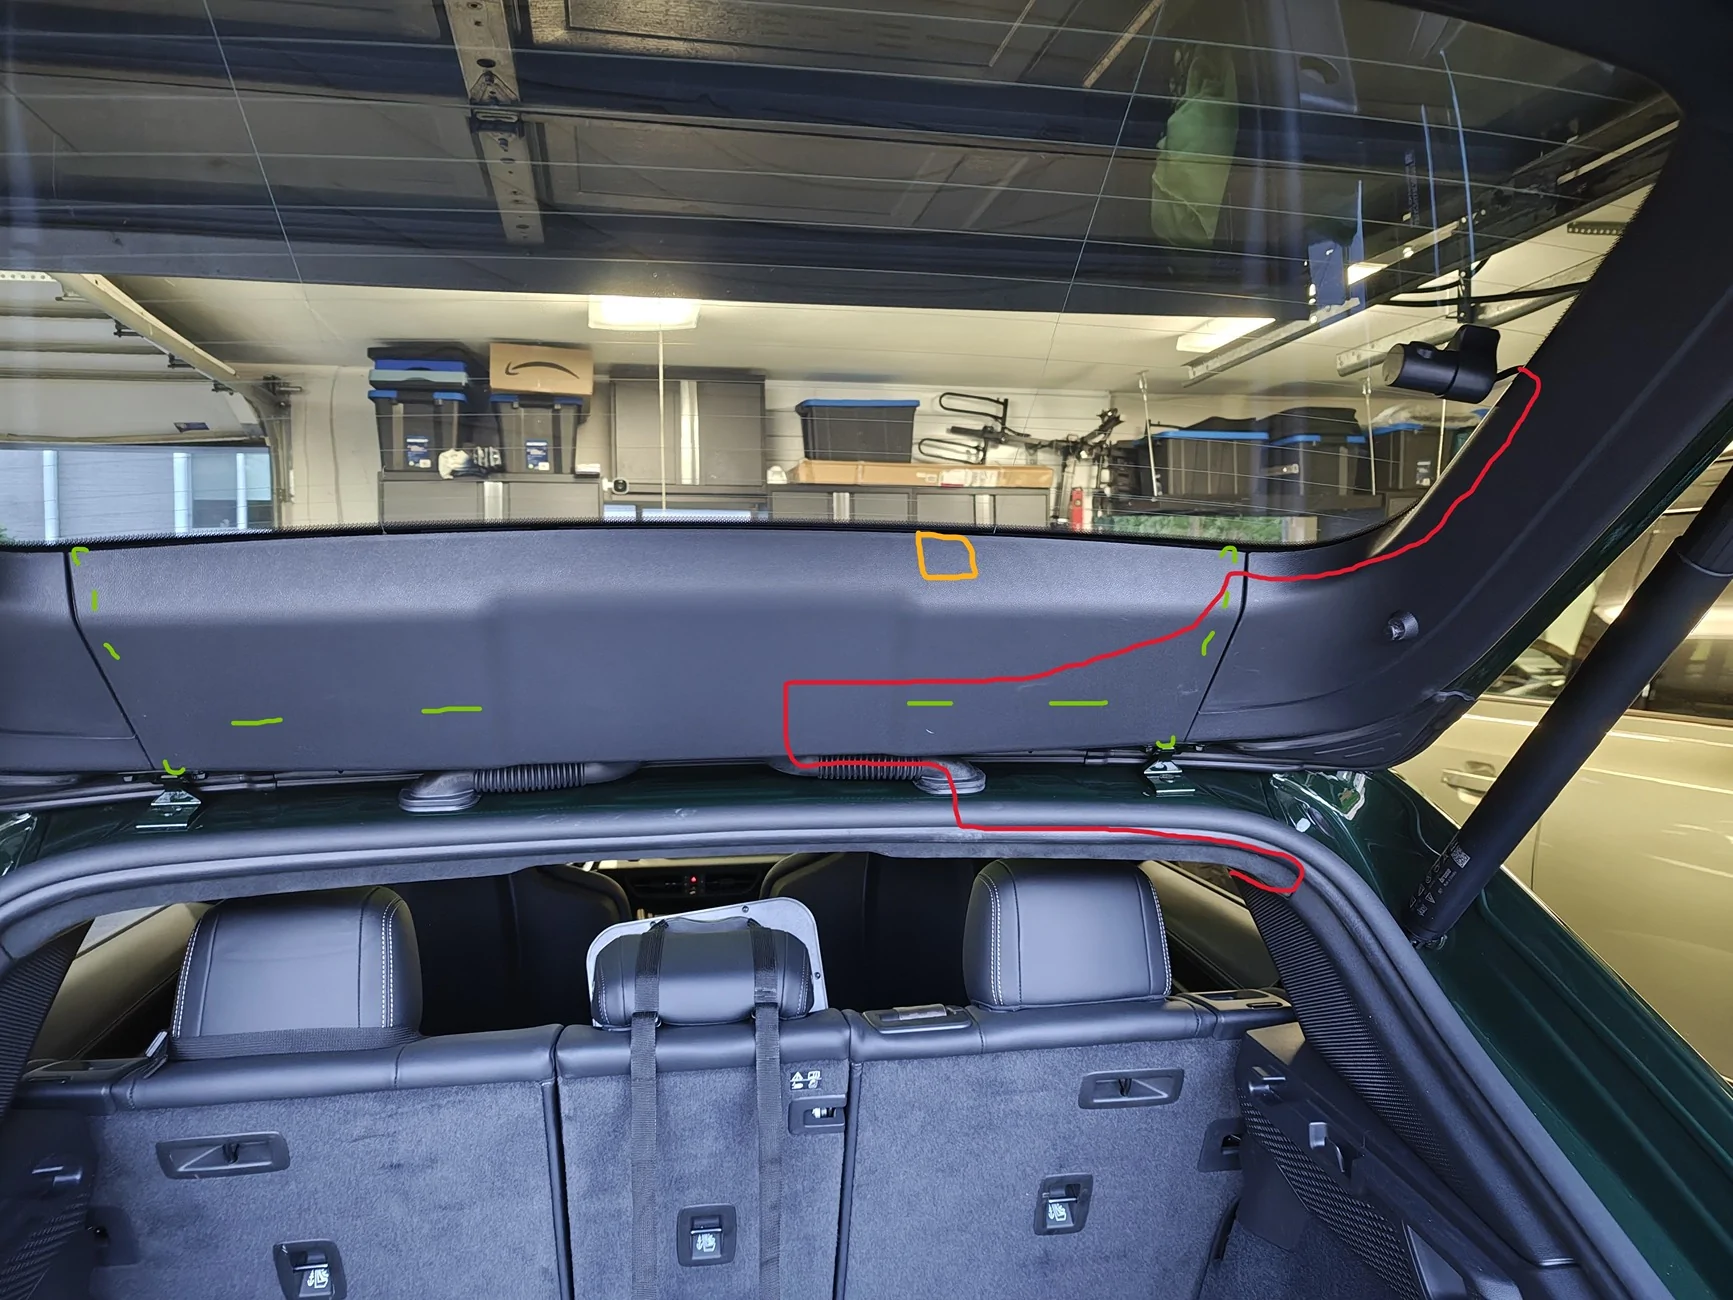
Now you'll need the wire pull here that's in the kit. with a pry tool you should be able to create enough gap to feed the wire pull up into the hole, then pull the camera wire through. no need to actually lower the headliner here like in the instructions. do the same trick to pull the wire through the rubber channel as it's pretty tight. Then you'll need to remove only the top trim from the hatch. photo shows the path of the wire in red, and the green dashes are where the clips are on the top trim. note that each corner has a sort of plastic hook/lip that wraps around the trim peices next to them. you'll need to bend the corners outward to disengage the hooks before starting to pull. clips on the sides are plastic, clips in the middle are metal.
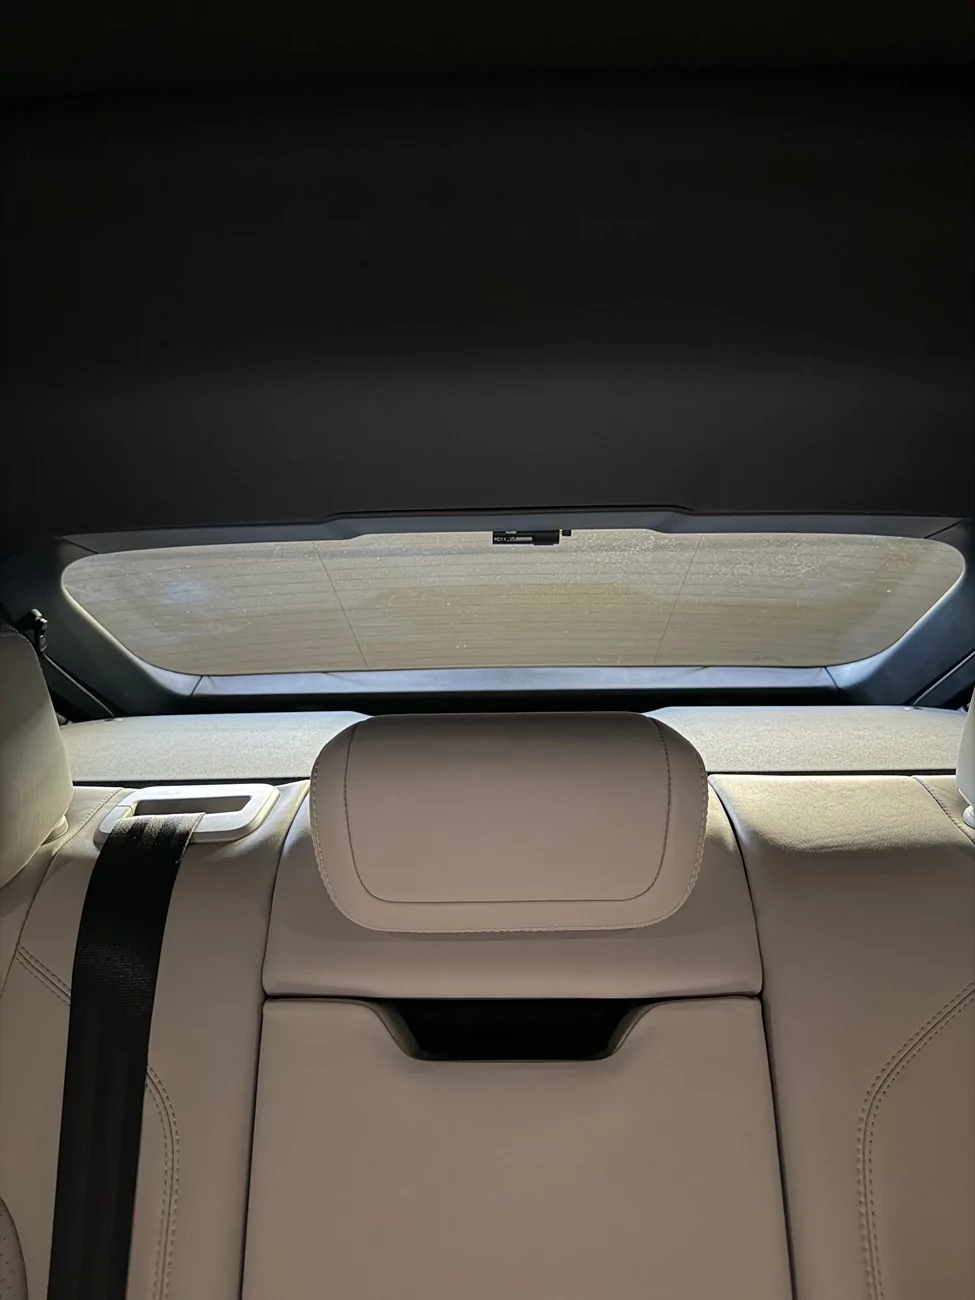
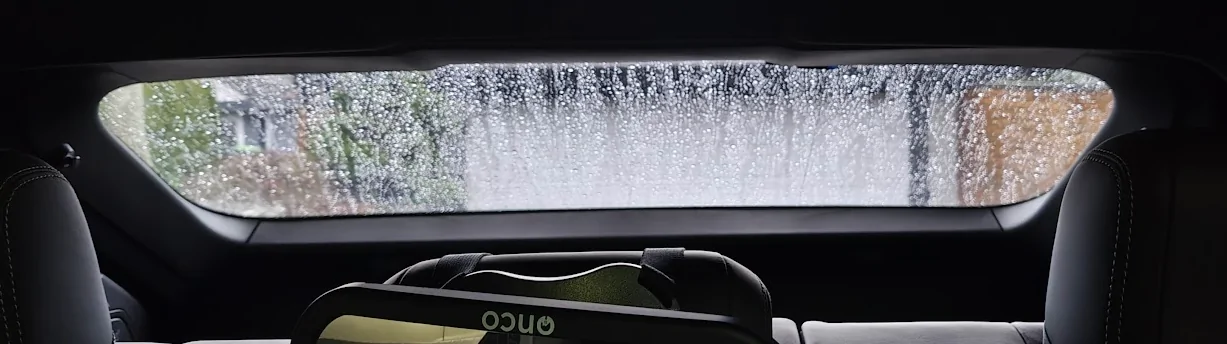
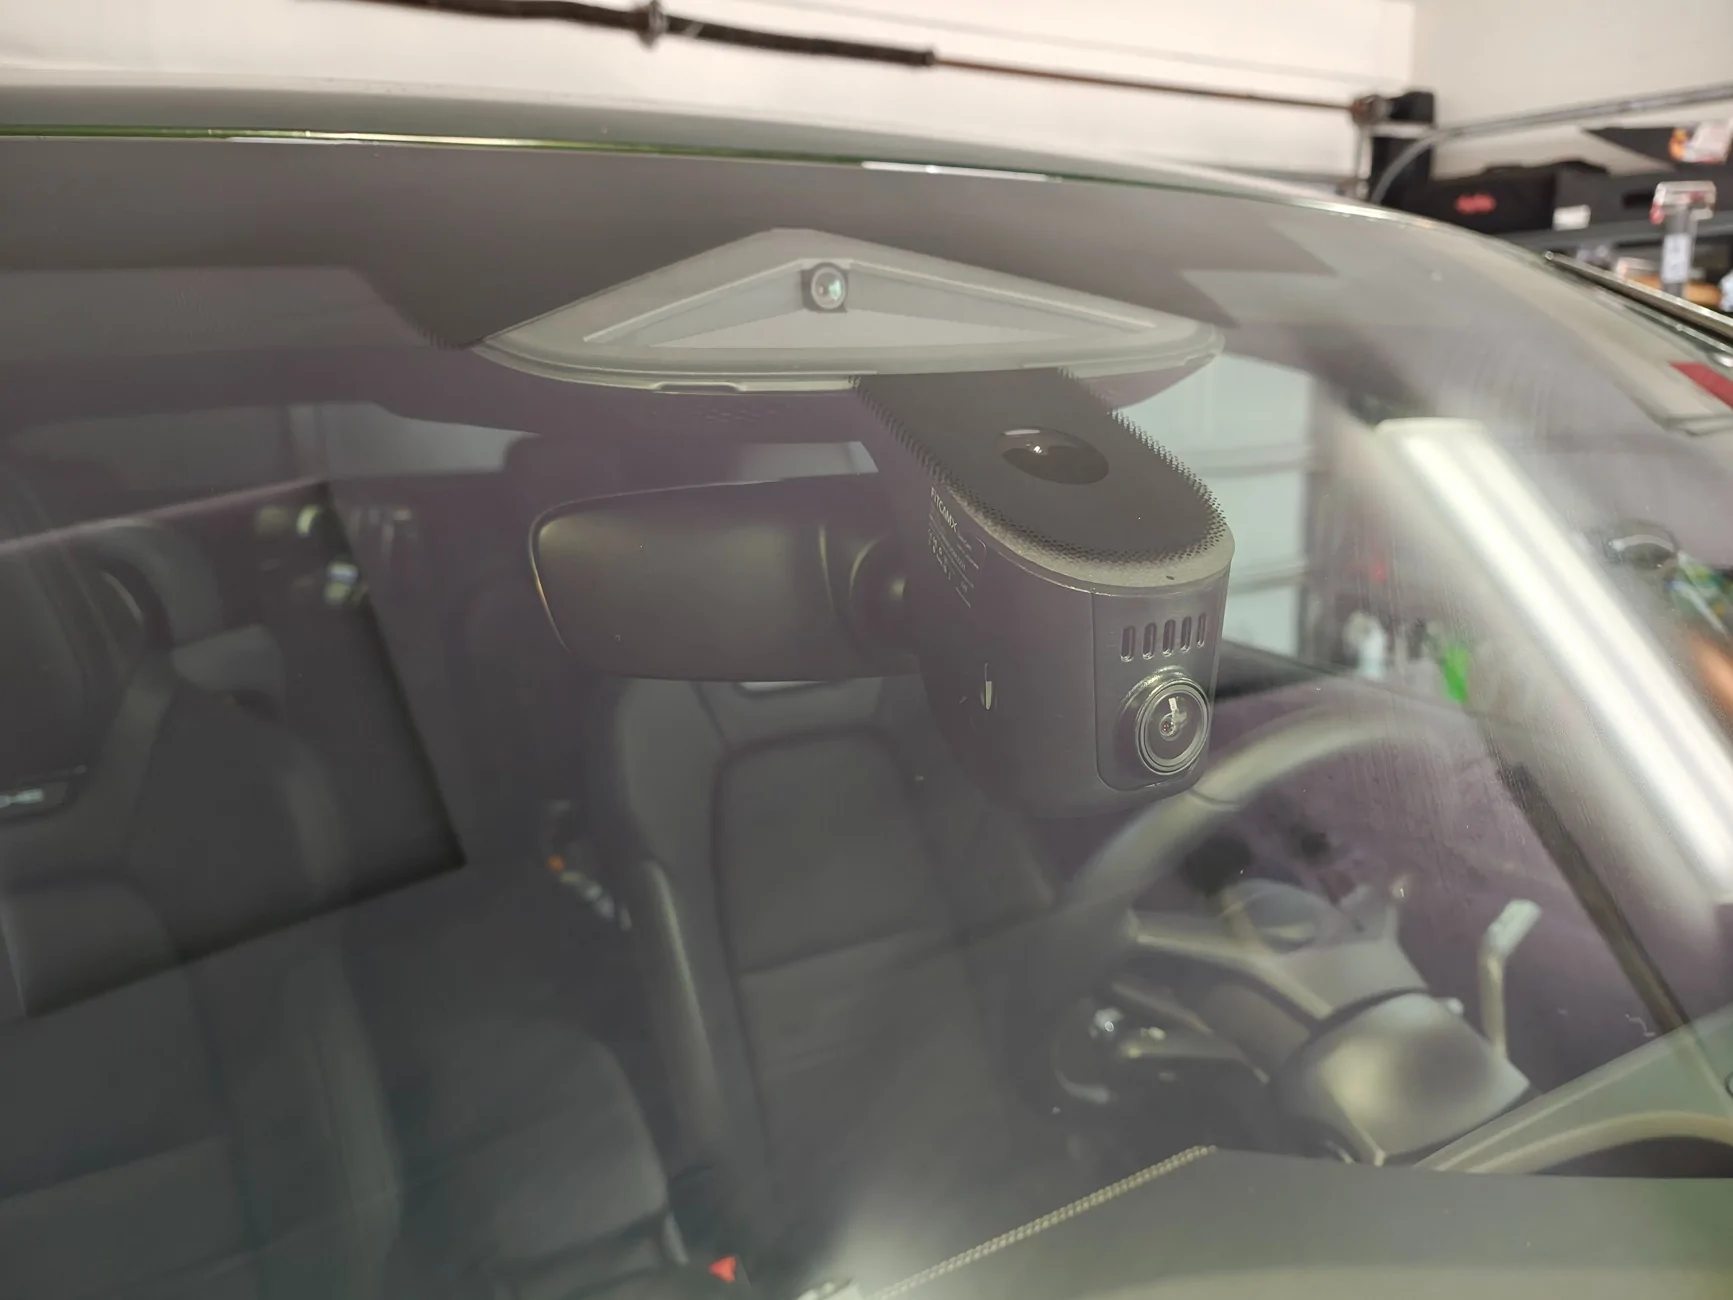
That's about it, after you choose a spot to place it, just bundle up the excess wire and pop it behind that top trim with some foam/cloth tape to stop rattles. I chose to install the rear camera here as it's as high as it can be while being completely hidden behind the rear headrest. The rear visibility is already bad enough in the macan, didn't want to compromise that. Do note as the glass is curved here, the camera will be at a slight angle and not quite centered, but it does the job. I was more worried about the looks/position of it not annoying me than the video quality.
Update: realized you can mount the camera on the top plastic trim itself (yellow square), up against the glass, and it is almost completely hidden in the rear view. Drivers side hides it a little better. This also means you don't risk damage to the defrost wires if it ever needs removed.
Finished product below :
When ordering the fitcamx, get the model A, they will reach out to confirm your vehicle model, and when they did this I decided to ask if they had an adapter for the prewire connection. I sent them a picture of the connector, and they threw one in the box with my fitcamx free of charge. I don't know why they don't advertise this on their listing page, but having that adapter really simplifies things. It gives you parking mode without having to bother tapping into fuses, or worry about the piggy back adapter causing issues with your wiper sensor. As it's leveraging the factory dashcam connection I don't see how warranty could have any issues with it.
What you'll need:
- FitCAMX (I got the 4k with rear camera)
- Dashcam prewire adapter from fitcamx
- A good set of pry tools (https://www.amazon.ca/dp/B09BB8VFLY?ref_=ppx_hzsearch_conn_dt_b_fed_asin_title_1&th=1)
- wire pull tool (comes in the pry tool kit above)
- automotive cloth tape and some foam.
Install :
1 - Start by removing the forward part of the overhead console trim. Get two solid wide pry tools at the two green arrows and push towards the windscreen. You can do one side first, I think that is how it went for me. Needs quite a bit of force, be careful not to scratch/mark the trim.
This is the inside of that trim peice for reference on where the clips are. red are the clips, green is a sort of silicone/rubber guide, and yellow is a tether that holds the trim to the car in an accident :
2- Lower the main overhead console. This is where that cayenne thread has bad information, do not start trying to pry it off, the outer trim can be removed, but you don't want to do that. the part labeled (1.) in the photo below is actually a spring loaded switch that pushes inward, it disengages the two tabs (2.). Just grab the larger metal pry tool from the set above, insert the flat end in the direction of the arrow and push the switch in. it does not need much force and disengages very easily when pushed correctly. The unit then swings down on a hinge and exposes the pre-wire connectors.
3- Next remove the rear view mirror (you could do this before the console if desired). First step is to remove the inner windscreen trim (not the part the fitcamx replaces, that is the outer trim.). to do this pry the top corners of the outer trim outward to release the tabs on the inner trim, then give it a firm pull downward and it should be off. It is tethered to the car, just leave it dangling.
4- Remove the rear view mirror itself from the car. DO NOT try to remove the outer trim, I couldn't figure out why, but it is very difficult to remove with the mirror on the car. I wasted a lot of time trying to get it off, was surprised I didn't break it honestly. After removing the mirror it comes off easily. Just grab the base of the mirror itself, and rotate it counter clockwise (lefty loosey), it'll move maybe a 1/4 turn and can then be pulled down. it has a tether and will dangled from it no problem. Below is it dangling with the two lines being where I routed the FitCAMX's two wires. The red line is where I routed the main dashcam wire, and the green line is where I ran the rear camera wire. There is a very tempting looking hole for the rear view mirror wiring connector, but there just wasn't quite enough room to fit either of the fitcamx connectors through it. after deciding on the route for the wires pop the fitcamx onto the mirror, then put the mirror back on the car. Pretty straight forward, i hooked the bottom two prongs on first, pushed the top flush, then rotated right/clockwise until it clicked back in place.

5- Connect the fitcamx -> porsche prewire adapter, and feed it and the rear camera connector through to the main overhead console. There is plenty of room, and the adapter is the perfect length. highlighted the pre-wire connector in the car in red, the fitcamx adapter clicks in very easily. the green highlight is the rear camera FAKRA connector, we won't need to use this.
6- Install the dashcam fuses as per the official porsche prewire instructions here : https://static.nhtsa.gov/odi/tsbs/2024/MC-11011672-0001.pdf. the 5A fuse box is located in the passenger footwell, very easy to access, i circled where the fuse goes. the 10A fuse goes in the fusebox in the frunk, remove the cover that is circled, it goes in slot 1 which is labeled, and there is a diagram of it's location in the instructions.
6- Run the rear camera wire along the passenger side of the car along the edge of the headliner. it tucks under the roof lining quite easily the whole way along. the B Pillar is a little fiddley, but quite straight forward. Given the rear pre-wire location on the side of the luggage compartment, there is no point to try and leverage it, it's faster to simply run the fitcamx wire. The only complication is getting it through the trunk door wiring channel. You'll need to pry off the rubber cover from the plastic base that is clipped into the frame of the car, do this for both ends of the channel. note to put these back after you pull the wire through you'll need to unclip the plastic base from the car, then pull the rubber channel back over the edges of the base, and finally clip the re-assembled part back into the car.
Now you'll need the wire pull here that's in the kit. with a pry tool you should be able to create enough gap to feed the wire pull up into the hole, then pull the camera wire through. no need to actually lower the headliner here like in the instructions. do the same trick to pull the wire through the rubber channel as it's pretty tight. Then you'll need to remove only the top trim from the hatch. photo shows the path of the wire in red, and the green dashes are where the clips are on the top trim. note that each corner has a sort of plastic hook/lip that wraps around the trim peices next to them. you'll need to bend the corners outward to disengage the hooks before starting to pull. clips on the sides are plastic, clips in the middle are metal.

That's about it, after you choose a spot to place it, just bundle up the excess wire and pop it behind that top trim with some foam/cloth tape to stop rattles.
Update: realized you can mount the camera on the top plastic trim itself (yellow square), up against the glass, and it is almost completely hidden in the rear view. Drivers side hides it a little better. This also means you don't risk damage to the defrost wires if it ever needs removed.
Finished product below :
Sponsored
Last edited:

 . I think there was a spare 3M adhesive in the box, might have to move it if that is the case.